NOTE: The following screenshots are of the Japanese app with the Unofficial English Translations applied to the user interface. However, any content which is loaded from the Celsys servers is still shown in Japanese.
START SCREEN
 |
| Clip Studio Launcher 1.6.3 "Start Screen" (Japanese version w/ translation kit applied) |
Notice all those extra buttons at the top? Notice the big “Cloud” button that says “0.0GB / 10GB” at the top? Yeah, that’s because the Japanese users get an actual cloud with 10 gigs of storage. Whatever document they’re working on will automatically be backed-up to the cloud, that's what the "Works" section up top is about. It shows the four most recently opened documents.
Whenever you are uploading/downloading anything from the Celsys Assets site or Cloud the double-arrow icon in the toolbar will show how many transfer jobs are in process. Note that this is not the number of files being uploaded or downloaded, but the number of connections. For example, when you do the initial gigantic download of materials from the Assets site it will show as a single connection, even though it's about 1,500 files. If you want to see what's going on in detail, click the double-arrow icon and this Communication Management window will pop up, where you also have some control over those individual connections:
If you have the pre-1.5 versions of the apps installed you'll also have an earlier version of Launcher to manage Materials and Work for the "Legacy" apps. The Legacy apps cannot make use of the Cloud, newer format 3D materials, or use an alternate location for Materials or Settings. This is why 1.5+ install into a different folder isolated from the Legacy apps. It is possible to share one set of materials between the Japanese and English 1.6.3+ apps, but not between the Japanese and English Legacy apps or between the Legacy apps and the current ones.
Click HERE to read my post on the last Legacy Launcher release, version 1.1.7.
Whenever you are uploading/downloading anything from the Celsys Assets site or Cloud the double-arrow icon in the toolbar will show how many transfer jobs are in process. Note that this is not the number of files being uploaded or downloaded, but the number of connections. For example, when you do the initial gigantic download of materials from the Assets site it will show as a single connection, even though it's about 1,500 files. If you want to see what's going on in detail, click the double-arrow icon and this Communication Management window will pop up, where you also have some control over those individual connections:
 |
| When uploads/downloads are in progress you will see a progress bar for each active connection. |
Legacy Version
If you have the pre-1.5 versions of the apps installed you'll also have an earlier version of Launcher to manage Materials and Work for the "Legacy" apps. The Legacy apps cannot make use of the Cloud, newer format 3D materials, or use an alternate location for Materials or Settings. This is why 1.5+ install into a different folder isolated from the Legacy apps. It is possible to share one set of materials between the Japanese and English 1.6.3+ apps, but not between the Japanese and English Legacy apps or between the Legacy apps and the current ones.
Click HERE to read my post on the last Legacy Launcher release, version 1.1.7.
WORK SECTION
There’s an entire sub-section called “Work” in this Clip Studio app that lets you pick documents to load from the Cloud. Clicking the "Work" button in the top bar takes you to a full-fledge, cloud-connected, project management section: |
| Clip Studio Launcher 1.6.3 "Work" Section (Japanese version w/ translation kit applied) |
 |
| "Grunk's World" Drawer added to Launcher's "Work" Section |
Then, if you click the "Trash" icon to get rid of it you'll see the following warning about deleting an entire Work drawer:
 |
| The Work Drawer Delete Warning |
Unfortunately it's not a great translation. It should read:
Please note the following points in deletion of Work drawer:
- This only deletes the labeled drawer. To delete the actual files move them to the Trash.
- If the data in this drawer is not synchronized with the Cloud, the cloud data will also be deleted.
- If you are using the same data on another PC, that data will not be usable if it was not completely downloaded.
- Works "Not Found" will be deleted from this list and will not affect the actual file.
You can also right+click on individual items in the drawers which pulls up this context menu:
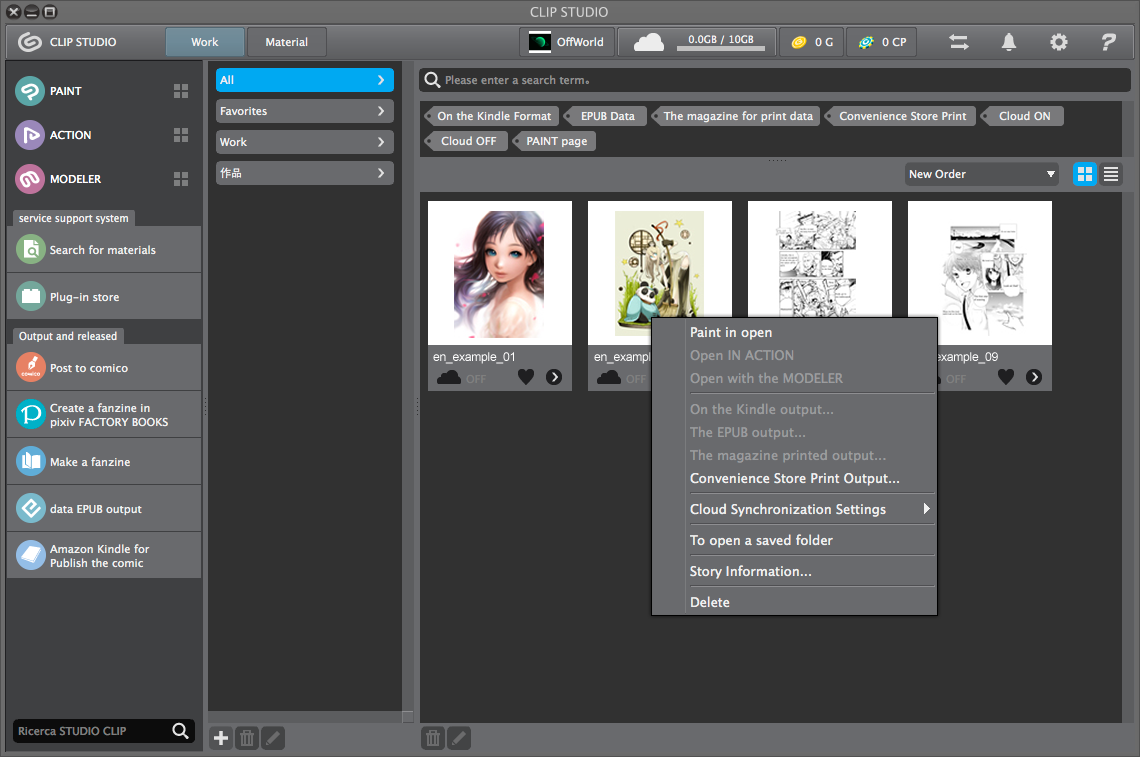 |
| Item Context Menu shows a number of additional options (not all of which are valid outside of Japan) |

That's because it doesn't just remove it from the organizing drawer, it puts it into the Trash for actual removal just like you dragged it out of a Finder/Explorer window.
NOTE: If you select a Work item and intend to open it in PAINT be aware that it will open in the Japanese version of PAINT. Also be aware that the latest version of PAINT will likely be set as the default for opening .clip or .lip files when double-clicking them in your operating system's file manager unless you change the default opener for those file types.
This can get confusing if you have multiple installations! For example, on my computer if have the Legacy Japanese Paint 1.3.2, Legacy English Paint 1.4.4, Japanese PAINT 1.6.4, and English PAINT 1.6.2 installed on my machine. It wanted to open all .lip/.clip files in the Japanese 1.6.4 because it was the latest version and the last one I installed/updated.
You can always override this behavior by right+clicking on the file and telling it which specific version to use when opening the file. But simply double-clicking may open it in an unintended installation.
SEARCH FOR MATERIALS/ASSETS
In the left-hand column there is an option to search for materials. This is the same as the "Assets" section in the non-Japanese versions of the Launcher app.
 |
| Clip Studio Launcher 1.6.3 Materials Search Screen |
The first thing you'll notice is that most everything is still in Japanese, which can make it difficult to use assuming you don't know the language. This is because Launcher is just acting a web browser to show you the Assets website. I strongly recommend, therefore, that you just open the website in your web browser directly instead. Specifically in Google Chrome since it will offer to auto-translate it for you. The direct link to the Japanese Clip Studio Assets website is: https://assets.clip-studio.com/ja-jp/
 |
| Japanese Clip Studio Assets Website (auto-translated by Google Translate) |
Once you've downloaded a Material it appears in the Materials Manager and in the Materials Palette of all the installed Clip Studio apps linked to that Materials collection (I state it that way because, unless you've specifically set different language installations to share Materials they are otherwise isolated from each other).
 |
| Downloaded Material in the PAINT Materials Palette |
Once it is in your collection you can move it under whichever Materials Folder make sense for organization purposes.
Ok, so what happens if you accidentally DELETED the downloaded material? You can simply go and re-download it! There are a couple different ways to go about that:
1. Download from Assets Website


2. Download with Launcher App


So, again, either click the Download icon in the lower right corner of the item(s) to download or click on the thumbnail to go to the Item Description page:

Again, because you're in the Launcher app there is no option to translate it. But the big red rectangle button in the upper right will re-download the item to your local Materials.
PLUG-IN STORE
In the left-hand navigation column, right below the Material Search you'll see something called the "Plug-In Store." In my opinion the lack of plugins for PAINT is one of its greatest weaknesses compared to other graphics software. Part of this may be because the ONLY source for plug-ins, third-party or otherwise, is through Celsys itself. Even if you acquire them by *cough* other means, or download them into the Japanese version of PAINT and manually copy them across to the English version, they won't do you any good. Because every time you start PAINT it does a validation check on all the installed plugins and won't let you use ones that don't pass the test. That means for users of the non-Japanese versions of PAINT the *only* plugins available to us are the default ones Celsys includes with the program.

The "Store" page is pulled from the Celsys servers and isn't available through the regular website (at least not that I could find), so it cannot be translated in-app. However, I took screenshots and ran them through Google Translate on my phone and here's what the list says as of 27 May 2017:
| TITLE | SELLER | OS | DATE | UPDATED | PRICE | DL'd? |
| Stripes Filter | tempura | Windows, Mac OS X | 2017/05/23 | 190 G | Not Yet | |
| 2 Tones Alpha Filter | tempura | Windows, Mac OS X | 2017/05/23 | 70 G | Not Yet | |
| Scale Filter | tempura | Windows, Mac OS X | 2017/05/23 | 190 G | Not Yet | |
| Posterization Alpha | tempura | Windows, Mac OS X | 2017/05/23 | 70 G | Not Yet | |
| Stellar Glow | Koizumi | Windows, Mac OS X | 2017/05/23 | 500 G | Not Yet | |
| Fluctuation distortion (filter) | Koizumi | Windows, Mac OS X | 2017/04/18 | 200 G | Not Yet | |
| Replace white with transparent / Replace black with transparent (filter) | tempura | Windows, Mac OS X | 2017/04/18 | 120 G | Not Yet | |
| Stripes (filter) | tempura | Windows, Mac OS X | 2017/03/30 | 190 G | Not Yet | |
| Add noise (filter) | tempura | Windows, Mac OS X | 2017/03/30 | 190 G | Not Yet | |
| Radiation glow (filter) | Koizumi | Windows, Mac OS X | 2017/03/30 | 400 G | Not Yet | |
| Hue Saturation Lightness modification (filter) | Yumeimoto play | Windows, Mac OS X | 2016/12/27 | 500 G | Not Yet | |
| Glow (filter) | Koizumi | Windows, Mac OS X | 2016/12/26 | 100 G | Not Yet | |
| HSV band correction (filter) | uochang | Windows | 2016/07/11 | 0 G | Not Yet | |
| Layer 3 D (filter) | Koizumi | Windows, Mac OS X | 2016/07/11 | 0 G | Not Yet | |
| Α value Level correction (filter) | Dreaming music | Windows, Mac OS X | 2016/06/01 | 500 G | Not Yet | |
| Pixelate crystal (filter) | grill Palzer | Windows, Mac OS X | 2016/06/01 | 0 G | Not Yet | |
| Automatic shadow color specification (filter) | Yui | Windows | 2016/04/20 | 0 G | Not Yet | |
| Automatic anime color conversion (filter) | Yui | Windows | 2016/04/20 | 0 G | Not Yet | |
| Replace designated color (filter) | Yui | Windows | 2016/04/20 | 0 G | Not Yet | |
| Point light source (filter) | htp 32 | Windows | 2016/04/20 | 0 G | Not Yet | |
| Analog style Kake Ami (filter) | Ika Flower | Windows | 2016/04/20 | 0 G | Not Yet | |
| Retro filter 2.0 (filter) | Manga | Windows, Mac OS X | 2016/04/20 | 0 G | Not Yet | |
| Concentrated line (filter) | Matcha | Windows, Mac OS X | 2016/04/20 | 0 G | Not Yet | |
| Streamline (filter) | Matcha | Windows, Mac OS X | 2016/04/20 | 0 G | Not Yet | |
| Color unevenness (filter) | Manga | Windows, Mac OS X | 2016/04/20 | 0 G | Not Yet | |
| Categories (Filter) | Manga | Windows, Mac OS X | 2016/04/20 | 0 G | Not Yet | |
| PDF I / O Plug-in | Celsys | Windows, Mac OS X | 2014/12/25 | 500 G | Not Yet |
MATERIALS SECTION
The button to the right of the Works section takes you to Materials Management, which is just like the CSP Materials Palette, except it also allows you to UPLOAD custom materials you’ve created to the Clip Site:
 |
| Clip Studio Launcher 1.6.3 "Materials" Section |
Those features were removed from the English version of the Clip Studio app because it’s not actually connected to a “cloud” at all. It’s little more than a web browser for the Clip Site, which is disappointing.
Actually the Japanese version has a bunch more options even on that drop-down menu. Here's what they say after you apply the Unofficial Translation:

And here is the Help Menu, though what it links to is in Japanese (of course):

The translation work on that menu isn't perfect, but you can pretty much ignore most of it anyway. The first item just links to a page about how to generally use the materials you download. The second one is general information on output formatting for printers. Good to know, but if you've ever worked with a printing company before they've probably told you how they want files formatted (granted the lack of support for "job" files means you have to set everything up by hand). The Kindle guide is really just using Kindle Direct Publishing tools. EPUP is only available as an output option from PAINT EX (not available in Debut or PRO versions). The "Convenience Store Print Guide" is for sending documents to a 7-Eleven in Japan, which offer copy-shop services. The "Cloud Guide" is probably good to look over since that's a new thing. Keeping in mind that you'll need to run the pages, which all open in your browser, through some kind of auto-translation first.
MATERIAL INFORMATION
If you plan to try uploading and sharing your custom Materials you MUST include information about each item. However you can edit the local information for any Material you have, for example providing notes for other users on your computer or reminders to yourself about if, where, when, or how you've used a given material. Regardless of why you're checking or editing the item's information here is how you do it.
1. Double-click on the item in the Material Manager
 |
| I have selected my "Grunk" 3D Character file |
2. Select "Material Information" from the next screen:
 |
| Click the last box "Material Information" |
3. You are taken to the Read-Only Information screen:
 |
| Click the green "Edit/Publish" button on the right bottom to go into Edit Mode |


When you are done editing information in each of the provided boxes press the "Temporarily Saved" button at the bottom. This only updates the information in YOUR local Materials Database.
The "Set Public Information" button is for defining in which application your material may be used and what (if anything) it costs. This only matters IF you were planning to upload and share or sell your custom materials on the Clip Studio Assets site.
You will be taken to screen on the Celsys Assets Site server that looks like this:
 |
| Set Public Information Screen for "Grunk" material |
Because this isn't a local page it is in Japanese. Here is what the above screenshot says in English:
"Grunk" Public Setting
* NOTE
Please do not describe conditions (commercial use OK · NG, name display necessary / unnecessary, redistribution prohibited, etc) that you can use the downloaded materials for introduction sentences, commentary · examples of usage, etc., so as to cause confusion of users. The range in which the material can be used is stipulated in the ASSETS "license scope" terms.
Free Charge
Input in units of 10 0 CLIPPY
TIPS
- The upper limit of CLIPPY is 10,000.
Target software
CLIP STUDIO PAINT PRO / EX
CLIP STUDIO PAINT DEBUT
CLIP STUDIO MODELER
CLIP STUDIO ACTION
Includes expressions that may make the viewer feel uncomfortable.
Example: Sexuality, violence, religion · thought, drinking, smoking etc. (About rating)
Temporary Upload
Return
The "About rating" in the translation above is a live link to the Celsys page explaining what content is acceptable and what materials would need to tick that checkbox about making viewers uncomfortable.
The "How do I sell materials with GOLD?" is also a live link to the Celsys page explaining it. Basically they pay a 70% royalty on every material sold, so they need legit bank account information and mail a developer contract you have to have a valid ID to accept - and presumably accept with a personal stamp used to "sign" legal documents in Japan. The online form's address section is Japan-only, so I'm reasonably certain selling your items for "Gold" and earning royalties is not available to anyone outside of Japan. If you really want to get into that business you could always contact Celsys directly and see if they'll work with you or make an exception (if you do and they either will or won't please leave a comment about it below).
NOTE: Whenever you are navigating AWAY from editing any kind of Material information it will show this warning box:

It tends to show the warning even if you have done a "Temp Save" on your changes. Not sure if that's a bug or just trying to make damn sure you mean to leave the editor?
UPLOADING MATERIALS?
So CAN we actually uploading materials? Maybe. I haven't actually tried it yet myself. But so long as you were offering free materials or selling them for "Clippy Points" you probably can.
We can’t upload Clip Studio Paint native materials created with the English version of PAINT to the Clip Site because the English version of the Launcher/Assets app doesn't have any options to do so. However you can now set different language installations to share one set of materials.
If you go to the actual Clip Studio Asset Site in your web browser (I recommend doing it in Chrome so it auto-translates for you) you’ll notice that the drop-down under your profile has more options than it does inside the English version of the Clip Studio Assets app:

Specifically, notice that it has a “New Upload” option that doesn't appear in the english-language version! But don’t get too excited. If you go to that sub-section there are three options:

That will ask to open the JAPANESE version of Clip Studio Launcher/Assets app if no version of it is already open. If you have the english-language version of it open it will shift focus to that. If you have the Legacy version open it will shift focus to that. If you want it to open the CURRENT version of the Japanese app either already have it open before you select the option in the browser or have NONE of the Launcher apps open.
You then select the assets to publish to the Clip Site in the Materials Management section by clicking on it and selecting "Publish Material to Assets." However you should probably add some descriptions and tags before you do that (see Material Management above).
You then select the assets to publish to the Clip Site in the Materials Management section by clicking on it and selecting "Publish Material to Assets." However you should probably add some descriptions and tags before you do that (see Material Management above).
The second option takes you to another screen where you can upload non-Clip Studio materials:


Exactly *which* file types are allowed I’m not sure. For example, I think this could be used to upload OBJ or FBX models, maybe PSD files. I also don’t know if it would include individual .sut (brush), .cls (color set) files, since they don’t normally appear in the “Materials” palette, but clearly people are contributing them to the Clip Site somehow. Can Westerners upload to the site? I don’t know yet, I haven’t tried. You apparently earn “Clippy Points” by uploading things to the site, which you can then use to buy the non-free items (the non-free items show on the Clip Site when viewed in a web browsers, they are automatically filtered out in the English version of the Clip Studio Assets app).
The last option on the Uploads Options page takes you to the “Help” documents. Specifically it takes you to this section (translated automatically with Google Translate):

I haven't actually tried uploading anything yet. I think it should work (unless they are IP blocking for some reason). But that second upload options explicitly says it's for NON Clip Studio files and that you can't upload collections in ZIP files either. If someone else wants to try it ahead of me and it works or doesn't work, please leave a comment to that effect below. If it doesn't work, then you can always use my work-around method.
MATERIAL COLLECTIONS
Collections, as the name implies, are a group of related Materials. So let's create one! First go to the the Materials section in the Launcher app. Then look at the bottom of the second column:

1. Click on that "New Materials" button. It will pop up a box asking you to enter a name for your new collection:

Enter a name and click "OK" and *BOOM*
2. Your Collection is created in the list of collections. Click on it and it will replace the huge list of Materials:

3. Material Collection Information

Just like any other kind of Material a Collection has the options to "Publish" or Read/Edit the information. Let's look at the info and edit it...
4. Edit Collection Information

Ok, first I had to click the "Edit" button in the lower right. As you can see I entered some descriptive text in the box, but lets also set a custom thumbnail image. Click the "Select Image" button above that "No image" picture. It will open your file manager to browse to the image. The image MUST be 240 x 240 pixels and in JPEG format. If it's not you'll see this warning:

Now our Collection has a nifty thumbnail to help us know what is in it:

Well, actually NOTHING is in it! Let's remedy that...
5. Adding Materials to a Collection
This is as simple as dragging and dropping the items out of the Materials Manager onto the Collection name in the collections list:

Go through your Materials Folders finding each item you want to add to the collection and drag and drop them onto the Collection name. Now when we click on the Collection it will show us everything that is included in it like this:

The "During Editing" means it is currently being edited and "You may add material." If you published it to the Assets site you can't add any more materials to it. The "Not Up" text for each item indicates that these Materials have not been uploaded to the Assets site either.
6. Collection Management of Items
If you click on the "Management" button for the Collection you get back to the Edit screen, where you'll now see it has the things we added listed:

It automatically creates "Category 1" and puts the things we dragged-n-dropped into it. You can change the order of them, or add more categories to organize the Collection contents.
DELETING COLLECTIONS
Ok, maybe you only put together a collection in order to have all the materials used in it in one convenient place and now you don't need it anymore? Or you've updated a published Collection and want to delete the old one. You select it in the Collections list and click the "Delete" button immediately above the list (or you can right+click on the Collection name and "Delete" form the context menu). If the individual items in the Collection *only* exist in the Collection, deleting it will also delete the items. This is usually only a concern if you downloaded a Collection. If you created the Collection yourself form items already in your Materials obviously you'll have the individual copies of those items as well.
LAUNCHER INFO SCREENS
Launcher has a bunch of sections that are really just information. For example each app has its own section accessed by clicking the four-squares to the right of the app name:

If you click the app name/icon on the left, however, that will OPEN that app. It's the icons on the right-hand side that will take you to the information screens.
That (1) by PAINT means there is a one update (in this case it was because I had version 1.6.3 installed and 1.6.4 had just come out). If you are using the Unofficially Translated versions of these apps be very careful about not updating them unless you know for sure the patches work with the newer version or patches for the newer version are available.
That (1) by PAINT means there is a one update (in this case it was because I had version 1.6.3 installed and 1.6.4 had just come out). If you are using the Unofficially Translated versions of these apps be very careful about not updating them unless you know for sure the patches work with the newer version or patches for the newer version are available.
Ok, lets take a quick look at each of those App Info Screens (they're all pretty similar):


You'll notice some of the blocks are still in Japanese. These are the updated data pulled from the Celsys servers in Japan. They are usually about app updates, but sometimes are also about events or sales. You can safely just ignore them.
The Cloud
The Cloud storage option is new in version 1.6.3 so it has its own Info Screen to help people understand how to use it. That last section takes you to the "Cloud Usage Guide" documentation. All that documentation is in Japanese of course, so you'll need to run that page through an automatic translation (I recommend visiting it with Google Chrome which will offer to translate it). I also have no idea if anyone outside of Japan can use the 10 gigs of cloud storage or not. I haven't tried using yet myself. I have, however, gone through both the (translated) Celsys Terms of Use and Terms of Service for the Cloud and saw nothing in it expressly prohibiting people from outside Japan from using it. It just says you need to register with a valid e-mail address and, if you're under the age of 13 do so with the consent of a parent or guardian.

CONFIGURATION

This screen is pretty straight-forward (once it's translated). You can tell it to either use the cloud or not, and if you do whether you want to use it for Software Backup and/or Material Synchronization. One of the more important things mentioned in the "Cloud User Guide" is:
Storage period and capacity of cloud service are as follows.
- Cloud data of CLIP STUDIO account which has not been synchronization for more than one year will be deleted.
- Capacity is up to 10 GB.
- Up to 30 software backup histories are allowed. Oldest backup will be deleted automatically to add new one.
About capacity over time
If the capacity is exceeded, only the upload operation to the cloud is restricted (new data and update data are not uploaded). The downloading behavior is not limited.
SOFTWARE RECOVERY
 |
| Cloud Software Recovery populated with backups (translation added to screencap) |
This option will save back-ups of your software tools and settings so you can recover and restore them if necessary. As noted above it will only save up to 30 back-ups, and then when you add a new one it will delete the oldest restore point. This is obviously data pulled from their servers, which is why it appears in Japanese and can't be translated with the rest of the app. I've added translated text to the screencaps so you know what it says. When you first go to this section, though, there won't yet be any backups in the list, so it looks like this (translations added):
Below the list of backups there are bunch of buttons. You can safely ignore them as they are mostly just legal notices.
Terms of Service - this button launches your web browser and takes you to the general Celsys TOS page.
Privacy Policy - pretty standard online privacy policy, specifically is opt-in for sharing data with third-parties.
Copyright & Trademark - standard intellectual property notices related to the software and content.
Commercial Transactions - opens your browser to a page about how to buy, sell, and return items - including "Gold" and "Clippy Points" under Japanese commercial transaction law.
Fund Settlement - this regards their policies on charging or paying in the "Gold" currency used on the Assets site. However, in reading how to sign up for it, it doesn't appear to be available to people outside of Japan.
NOTE: I have personally contacted Celsys customer service before and while the language-barrier is problematic, they did make the effort to reply promptly and in english.
GOLD and CLIPPY PASSBOOKS
At the top of the Launcher app you'll notice the "G" and "CP" buttons to the right of the Cloud button. These stand for "Gold" and "Clippy Points" - the two different kinds of electronic currency used on the Japanese Clip Assets website. The numbers obviously tell you how much "money" you have available in your accounts. Clicking on each of those buttons launches your web browser and takes you to your Celsys Account "Passbooks."
CLIPPY PASSBOOK
 |
| Clippy Passbook Account Screen (auto-translated by Google Translate in Chrome) |
GOLD PASSBOOK
 |
| Gold Passbook Account Screen (auto-translated by Google Translate in Chrome) |
You BUY "Gold" with your credit card. I can't think of any technical reason people outside of Japan wouldn't be able to buy it, they accept Visa, MasterCard, and American Express. As for the actual "Gold Membership" though, that looks like it might be more problematic since the sign-up form is only set up for people living in Japan, they require bank account information to transfer "royalties" for anything you sell on the site in "Gold" that you want to cash-out into real money, and they require you to sign and sign for an actual contract to that affect - which they snail-mail, presumably only to Japanese addresses, and require signature confirmation to accept the paperwork. And in Japan you "sign" for stuff with your personal stamp. I don't see how any of that would work for someone who doesn't live in Japan, but if YOU want to contact them and find out be my guest.
OUTPUT and RELEASE SCREENS
The lower section of the menu along the left-hand side is dedicated to various ways users (in Japan) can output their Work. These are just INFORMATION about the various output methods. You can pretty much ignore all of it. But for the curious, here's what those sections are about...
Post to Comico
This is a ComiXology-like site, though I think it's more for aspiring talent to get their stuff in front of an audience. No idea if it's open to people outside of Japan or not. The comico website is at:
 |
| comico Android app |
Create Fanzine with pixev FACTORY BOOKS - This is a small-run printing company, but it only ships within Japan.
Make a Fanzine - links to tips on how to configure PAINT documents to various printer specs.
EPUB output - is built into PAINT EX, I think other versions need the plug-in to do it?
Publish Comic for Amazon Kindle - just links to Amazons Direct Publishing website. In the Unofficial Translation Kit I have redirected this to the US version of that page.
NOTE: The people who translated it in the app chose to use "fanzine" but it actually says "doujinishi" which has a slightly different connotation, but suffice it to say it means any kind of indie, self-published book with illustrations.
No comments:
Post a Comment