I recall the rare occasions as a kid that I got to go anywhere that had arcade games. As the games grew more complex they sprouted additional buttons, and increased the likelihood that I'd die all the sooner. Which is why I often had to give the Pinball Machines a quarter or two. No matter how many extras bells, whistles, lights, ramps, flippers, etc., they put in them the controls remained dirt simple - buttons on the left controlled left flippers, buttons on the right controlled right flippers, and if the game got stuck you'd nudge it lightly and hope it didn't "tilt" on you.
I've been writing the last couple of months on this blog about setting up my XBMC "media center" PC in the living room, and adding video game emulators to it. Well, now it's time to add PINBALL to my emulation fun!
There is a kick-ass pinball simulator/construction set program called "Future Pinball." If you're running Windows you can just go to http://www.futurepinball.com/ and download and install it. But if you're on a Linux machine, like I am with my "media center" then you need to get a custom installation script here: http://fprelease.free.fr/fpwine/
Just run that script and it will create a custom WINE install just for Future Pinball. Initially I tried following instructions I found in the Ubuntu forums for putting it in my existing WINE install, but every table I tried to run complained of script errors and froze. The install from that handy, dandy script, though worked perfectly out of the box. So I'd highly recommend it.
Make sure to go to the Future Pinball web site (http://www.futurepinball.com/) to get the "Sci-Fi Classic" demo game. It's actually pretty good, and some other tables people have created require it be installed so their table works. You'll be putting the files into a subfolder located at:
~/.fpwine/drive_c/Games/Future Pinball/Tables
You need to extract them to there (can't be ZIP files), and while many will work just fine in the sub-folders extracting creates, some will only run if the files are no lower than the /Tables folder. Especially the ones that require the demo table be there alongside them, however when you open them in the editor it will TELL you it needs files from another table. Then either copy that table's files in with the new one, or pull those tables out to live with the one on which they are dependent. If you have tables that didn't complain about dependency that freeze or crash on you, they tend to only do it when you want to PLAY them. Some can be fixed simply by opening them in the editor and saving them. Others will need to be moved out of their sub-folders to run. It can be a bit picky, but you only need to set this up once.
Since "demo" tables aren't that much fun, so you'll probably want a REAL table - by which I mean a faithful recreation of a classic one. Go to IRP Pinball site (http://irpinball.org/fp.htm) and look for your favorite olde tyme table. Don't stray off the page of that link I gave you, that's the Future Pinball stuff. Everything else on that site is for Visual Pinball (a different program). For some other recreations and original tables pay visits to the following sites and make off like you just knocked over an arcade:
http://www.blindmankind.tecnopinball.org/
http://www.roneypinball.com.ar/TablesRP.html
http://www.pinballaddicts.com/index.php?option=com_remository&Itemid=26
http://www.scapinosvpins.com/FuturePinballHome.htm
I'd highly recommend test-running each game (hit F5 within the FP editor) and doing that while still in "windowed" mode, just in case a table freezes you don't want to be stuck with it fullscreen and no way to get out of it aside from a hard restart. You'll probably want to play these full-screen, in which case (from within the FP editor) go to "Preferences->Video Options/Rendering" and look for the "Fullscreen" checkbox. You can also tell it whether you've got an older 4:3 "square" screen or a "widescreen" TV/monitor.
Ok, so if you're still with me you've got Future Pinball running smoothly in WINE, you've got an arcade's worth of machines to play - but it's a real drag having to open each in the EDITOR and then play it from there - especially when all you want to do is play them!!
Ideally, what you want to do is double click on a game name and have it run the game, ready to play, right? If you're setting it up to launch from XBMC like I am, you'll absolutely HAVE to do this.
Download the "Future Pinball Wrapper" program:
http://www.spacefractal.com/files/App/FuturePinballWrapper.zip
Extract the contents to your Future Pinball install:
~/.fpwine/c_drive/Games/Future Pinball/
Now, here's the tricky part. You need to SCRIPT this puppy to grab a Table file and run it with this Wrapper program. It will still launch the editor, but it will send it the command to "Play" it too.
When you used the install script for Future Pinball it created a file named "runFP" that will do nicely for our purposes. It is located at just inside your (hidden) ~/.fpwine folder. Copy that file and open it in your favorite text editor. I do this by hitting ALT+F2 and typing:
gedit ~/.fpwine/runFP
Now, you're going to see about 4 lines of code in that file, which is a simple little bash script. We're only going to modify the last line! So, find where it says:
WINEPREFIX=/home/user/.fpwine WINEDEBUG=-all wine /home/user/.fpwine/drive_c/"Games"/"Future Pinball"/"Future Pinball.exe"
(note: "user" is whatever your user name is)
Change it to something like this:
WINEPREFIX=/home/user/.fpwine WINEDEBUG=-all wine /home/user/.fpwine/drive_c/"Games"/"Future Pinball"/"Future Pinball Wrapper.exe" "C://Games//Future Pinball//Tables//Sci-Fi Classic.fpt"
Now, save as or save and rename that file to something like "Sci-Fi Classic" and check the permissions that it is executable. Put the file somewhere convenient, and now all you need to do is double click that file and it will automatically load and launch the Sci-Fi Classic Pinball Table. Oh, and you may need to click your mouse before you can play. It appears (on my system anyway) that the "focus" is still on whatever is underneath the game. Even though, when it is popped fullscreen, I don't see the mouse pointer a quick click or two seems to register as being "on" that window and then my keyboard input works to actually play the game.
For each machine you install just change the end of the path to point to a different file, save the script with a new name, and in the end you'll have a collection of custom launcher scripts for each pinball table you want to play. If you want to go a step further, most tables also include a screen shot of them and you could put that on as the icon for the file to make it pretty if you like.
Lastly, to launch them from within XBMC just use the "Launcher" plug-in I've been talking about now for a while, and tell it to run your custom script like a "stand alone" program.
Now, if you'll excuse me, I have some Pinball to play!
Monday, February 15, 2010
Sunday, February 14, 2010
Joystick Utility for Linux
So, here's the scenario on my Ubuntu Linux system. Every time I unplug a controller and either plug it back in or swap to another one I have to re-calibrate it. Which you have to do since most games and emulators expect the controller to be connected at "/dev/input/js0" so if you switch from a flight sim to a driving game you could leave them both plugged in and use root privileges to temporarily shift whichever one is connected at js1 or js2 (or wherever) to js0, but you're still going to go through recalibration before you start playing. Not that the calibration takes too long, but I'd rather be playing than calibrating, and I wanted a simple way to SAVE my calibrations so I don't have to do the same thing over and over and over.
Now, some of you might be thinking "there's a calibration utility already!" Um, yes, there is. It's called "Joystick Calibrator." And it doesn't work very well (if at all). Breeze through some Linux gaming forums and more often than not you'll see posts advising those having problems with joysticks to uninstall "Joystick Calibrator" because it can interfere (apparently) with other joystick stuff. What does seem to flawlessly work on Linux are "jscal" and "jstest" - but they are command-line only within a terminal, and don't SAVE your configurations!
Here's my solution: a simple bash script utility with a zenity UI that lets you recall calibrations for all your controllers! It will even simplify the task of shifting any connected controller to the golden "js0" spot!
Just copy the stuff below into a text file, save it and then set its permissions to allow you to "execute" it as a program. As the comments in it say, you'll have to plug in each controller in turn, run "jscal -c" on it, then "jscal -p" to get the calibration settings, copy and paste those INTO this bash script, and (of course) edit it so the options refer to whatever controllers you use. If you don't have "zenity" installed, it should be available in your distro's repositories.
(in case you're wondering, the "jscal -s" calibrations below are for a Gravis Eliminator flight stick, a Thrustmaster Pro Digital NASCAR driving wheel, and a Thrustmaster F2 Ferrari wheel).
#!/bin/bash
#
# Before running this utility you need to populate the data!
# From a terminal run: jscal -c /dev/input/js0
# Follow on-screen instructions to calibrate controller
# From terminal type: jscal -p /dev/input/js0
# Copy the line it returns and paste it where you see the "jscal -s" lines below
# Do this for every controller you plan to use
zenity --info --text "GAME CONTROLLER PRESET\nThis utility lets you select a calibration for a game controller."
joy=$(zenity --list --text "Game Controller Input" --width "320" --height "240" --radiolist --column "Pick" --column "/dev/input/" TRUE "js0" FALSE "js1" FALSE "js2" FALSE "js3" FALSE "js4"); echo $joy
if [ $joy != "js0" ]; then
zenity --question --text "Shift controller to js0?"
q=$?
if [ $q = "0" ]; then
gksudo ln -s /dev/input/$joy /dev/input/js0
fi
fi
# Enter the Names of your Controllers where it says ">>PUT NAME HERE<<"
# Add or remove entries as needed in format:
# TRUE|FALSE # "Controller Name"
cal=$(zenity --list --text "Game Controller Preset" --width "425" --height "275" --radiolist --column "Pick" --column "#" --column "Controller" TRUE 1 ">>PUT NAME 1 HERE<<" FALSE 2 ">>PUT NAME 2 HERE<<" FALSE 3 ">>PUT NAME 3 HERE<<"); echo $ans
# For each option above have an IF entry below
if [ $cal = "1" ]; then
# CONTROLLER 1
jscal -s 6,1,0,125,125,16776704,14509582,1,1,128,128,15338701,11930101,1,1,87,87,6170742,4098126,1,0,120,120,5368545,5592235,1,0,0,0,536854528,536854528,1,0,0,0,536854528,536854528 /dev/input/$joy
fi
if [ $cal = "2" ]; then
# CONTROLLER 2
jscal -s 3,1,0,124,124,9256113,6100620,1,0,254,254,2113601,-2147483648,1,0,255,255,4793344,-2147483648 /dev/input/$joy
fi
if [ $cal = "3" ]; then
# CONTROLLER 3
jscal -s 5,1,0,-144,-128,2033540,1525155,1,0,255,255,2105312,-2147483648,1,0,255,255,2105312,-2147483648,1,0,0,0,536854528,536854528,1,0,0,0,536854528,536854528 /dev/input/$joy
fi
Tuesday, February 9, 2010
XBMC Emulation Station
Last month I wrote a couple of posts about setting up XBMC on an Ubuntu Linux-based system as my Media Center/HTPC computer. After living with it for a while now I'm lovin' it! It's similar to - actually better - than when I had digital cable TV and "on demand" service. However, it remains a work in progress.
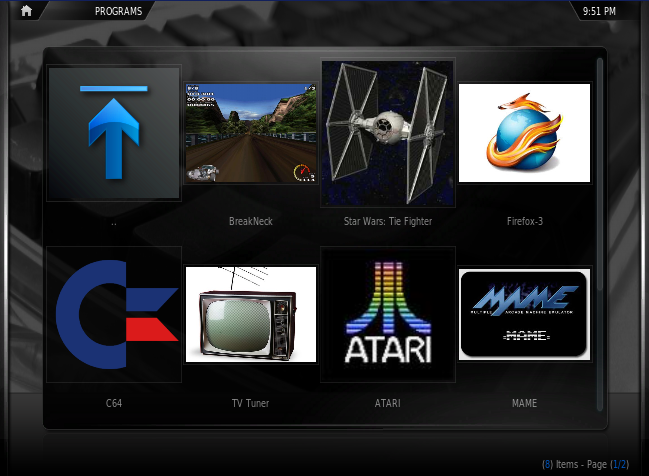
I also previously wrote about getting my favorite old Windows 95/98 driving game, BreakNeck, running in WINE so I could launch it from XBMC. I also got the ol' DOS "Tie Fighter" game running too. I probably started with the more difficult way to launch games by picking PC programs that require a CD-ROM in the drive - especially when I wanted to simplify my life by not having to swap the discs and just have the software swap iso images of the CDs. That, as I found out, required writing a custom executable script to do what you would normally type into a terminal window.
 My "Launcher" screen in XBMC
I've heard all this stuff about MAME, the Multi-Arcade Machine Emulator, and thought I'd check it out. So I installed "mame-sdl" from the repositories and "kxmame" as a front-end to make it easier to configure and launch games. I also noted that KXMAME can act as a front-end for MESS, so I added that too. I'd read tons of comments about "xmame" being terribly outdated, and that the SDL version was the way to go. I actually had some success with mame-sdl from the repositories, but when I ran into some issues and really started looking online for solutions I discovered that - for whatever reasons - the MAME stuff in the Ubuntu repositories is positively ancient and no longer being updated!! That led me to this web site: http://journalxtra.com/2009/11/how-to-install-sdlmame-and-sdlmess-onto-ubuntu/ with instructions on how to get the current SDL version of MAME and a slightly less current version of MESS (the Multi-Emulator Super System) to go with it.
Get SDL MAME here: http://sdlmame.wallyweek.org/
Get SDL MESS here: http://apt.ludomatic.fr/
Ah! But in order to install "sdlmame" (the newer, but not newest one) I had to uninstall "mame-sdl" which also took "kxmame" with it. Which had me thinking I needed a more current alternative to KXMAME that would (ideally) run both MAME and MESS. And I found it without too much trouble, it's called "Wah!cade" and you can find out how to get it at: http://www.anti-particle.com/wahcade.shtml. It is a linux version of "MAMEwah" written in python. Setting up MAME with it is really easy. Setting up MESS is a little less obvious, but I eventually figured it out.
But then I ran into some problems with MESS. While I could get various emulations to run, I couldn't get any of them to actually run a program. I think there's something to be said for focusing on one thing and doing it well, rather than trying to do everything and accomplishing nothing. After messing with MESS for most of an afternoon I decided it wasn't worth the effort to try and figure out why it refused to run perfectly good programs. A second problem was that nothing I did would make the XBMC Launcher plugin actually launch the Wah!cade front-end. I suspect it's because there is no compiled binary for it, it's a Python script - and XBMC is powered by Python scripts. I didn't look at the crash logs, but I'm guessing XBMC mistook "Wah!cade" as a script it was supposed to run and then couldn't figure out what to do with it.
Well, then it occurred to me that I really don't NEED something like "Wah!cade" anyway because XBMC can be my front-end for emulated retro gaming.
I had no problem setting up the XBMC Launcher plugin for running MAME. In fact, now that I think of it, the first screenshot I saw of the Launcher plugin in use had a thumbnail for MAME right there. D'oh! I suspect if I'd been able to get MESS to function correctly it would have similarly been easy to configure for use via XBMC, but I decided to use dedicated emulators for Commodore and Atari that are known to be very, very good at what they do.
So, next I set up the Commodore 64 emulator VICE too. The "Launcher" plugin for XBMC was actually intended more for programs like VICE as the plugin has two options - to either launch an application binary OR to launch a file in another program (i.e., a ROM file in an emulator). So that's super easy to set up once you get it pointing to the actual binary file (which is "etc/bin/x64" btw).
Then I downloaded the great Atari 2600 emulator "Stella" and set that up in a similar fashion. For both VICE and Stella it populates a sub-directory where you have all your games. Then, if you want, you can fiew them as "Thumbnails" and use the "Get Thumb" option from the Right+Click menu to find a suitable image for the game (such as box art, a screen shot, or a scan of the cartridge). That makes XBMC a really slick, unified front-end application for any number of emulator programs.
 "Atari" section with customized thumbnails showing cartridge images
The next issue was that when VICE launches it would cover the screen, and with the right video settings I could hit "ALT+D" and get it to pop out of the window frame at full screen size - but it wasn't TRUE fullscreen because the menu bar and status bar were still there! On a Windows system popping VICE fullscreen is really, truly full screen (no menu bar, no status). Looking around online I found that this is a long-standing issue with VICE on Linux, and (surprise, surprise) the version in the official Ubuntu repositories is outdated. I learned there is a new SDL version that will actually solve the fullscreen problem - but you have to build it from source. That had me scared because:
a) I've had limited success building programs from source
b) I've read pages of forum posts by people who couldn't get VICE to compile
But I decided to risk it if the potential payoff was working fullscreen. First of all you need to GET the correct source files for VICE 2.2 then you need to follow the instructions in this post: http://ubuntuforums.org/showthread.php?t=278022 and where it talks about adding options to the "./configure" command you will need to include "--enable-sdlui" (if you select contradictory options it will warn you so you can choose. For example, you can't select both --enable-sdlui and --enable-gnomeui). Oh, and make sure you install the SDL dev stuff from the Ubuntu repositories or it won't compile (it will error out telling you it can't find any of the SDL stuff it needs). It will take you 15 minutes or so to configure, make, and install it, so be patient. Much to my pleasant surprise I compiled it without any problems!
Interestingly, when you run the install it doesn't put all the files in the same places as the older version from the repos - which meant I had TWO versions of VICE installed and could choose to run either (one puts binaries in /usr/bin and the other were in /usr/local/bin). The moment of truth was running it. At first it opens VERY, VERY small. There is no menu bar and, unlike the default user interface (by which I mean if you compile without any custom options) you can't just right+click to get menus. Nope, this SDL one is a different animal. Hit F12 and you'll be taken into the options. Navigate with the arrow keys and the "backspace" key. Because it was so tiny on my screen, and I was looking at it on a low-res TV screen, I had to sort of squint and guess I was selecting the options to "double" the size (which allowed me to actually READ the options) and then I enabled "fullscreen" and bingo! True full screen, with no window frames, menu bars, or status.
XBMC needs to be pointed to the new VICE 2.2 binary file or it will continue launching the old version. You could go in and "remove" the existing Launcher item and add the new one, but that will force you to re-import your C64 software library, and if you spent any time making things pretty with thumbnails you'll need to re-do all of them. So, I'd recommend you just go edit the XML file: ~/.xbmc/user data/plugin data/programs/launcher/launchers.xml and open it in gedit (Text Editor) scroll down until you find the entry for VICE and edit the path so it points at the newer version's binary file. Incidentally, the Launcher plugin doesn't always find great thumbnail images for you - it only gives you a maximum of 10 options from a Yahoo image search and a lot of them probably suck. This XML file is also where you can point the Launcher item thumbnails to any image you have stored anywhere on your computer (the default location for Launcher thumbnail images is ~/.xbmc/user data/User Data/Thumbnails/Programs/ (which you may notice is NOT the more obvious "Thumbnails" folder a level higher up).
So, there you have it. XBMC as a slick front-end to WINE, MAME, VICE, and Stella - and can be for other emulators as well.
EDIT: Screenshots added
Subscribe to:
Posts (Atom)