Ok, here's a little trick I figured out today that I had previously been told was "impossible." I opened a file created in InDesign CS4 with InDesign CS. And it looked ok.
InDesign, much like QuarkXpress, only lets you save down one version with the "interchange" (.INX) format. So if you create a document in CS4 and need to open it in CS3 you do "Save As" select the Interchange format and then open that (rather than the .indd file) in CS3.
Ah! But what do you do if you need to open that file in an InDesign version OLDER than the the previous version and you don't have access to the version(s) in between? Most people (including Adobe) will tell you that you're screwed. But you're not! Or at least not totally screwed.
When you save to INX format it creates an XML file which the previous version uses to rebuild the structure of the document it's own way as best it can (assuming it has all the updates to the program and plugins applied). If it encounters any data it doesn't understand (for example, features that were added to the newer version) it will just ignore that stuff and move on. Obviously that means the more features you used that aren't backwards compatible the more screwed up your file will be when it's opened in an earlier version. BUT, if you have a fairly simple layout you may not need to tweak anything.
Since the INX file is just a text file you can easily open it with WordPad or NotePad (on Windows) or Text Editor (on Mac) and you only need to change ONE STINKIN' NUMBER to make this work, and it's in the second line of the file. Let's say I've created a file in InDesign CS4 and used the Interchange format to save it backwards for InDesign CS3. The second line of the INX file will read something like:
?aid style="33" type="document" DOMVersion="6.0" readerVersion="5.0" featureSet="257" product="6.0(578)" ?
The "6.0" then refers to CS4, from which we exported the file. The "5.0" in the "readerVersion=" part means CS3, because we told it to save it for CS3 which will be "reading" the INX file.
To open this file in CS2 without actually having access to CS3
Change: readerVersion="5.0" --> readerVersion="4.0"
To open this file in CS without actually having access to CS2 or CS3
Change: readerVersion="5.0" --> readerVersion="3.0"
That's IT! The INX file I exported from CS4 opened in CS perfectly. Then I immediately just saved it as a different name as an .indd CS compatible file. Granted it was a simple layout and apparently didn't use ANY special features added to the software between CS and CS4. Odds are most files will lose something going backwards in time that far, but the point is to be able to OPEN the file so you don't have to rebuild it from scratch.
Wednesday, March 24, 2010

Monday, February 15, 2010
Linux Launcher for Future Pinball
I recall the rare occasions as a kid that I got to go anywhere that had arcade games. As the games grew more complex they sprouted additional buttons, and increased the likelihood that I'd die all the sooner. Which is why I often had to give the Pinball Machines a quarter or two. No matter how many extras bells, whistles, lights, ramps, flippers, etc., they put in them the controls remained dirt simple - buttons on the left controlled left flippers, buttons on the right controlled right flippers, and if the game got stuck you'd nudge it lightly and hope it didn't "tilt" on you.
I've been writing the last couple of months on this blog about setting up my XBMC "media center" PC in the living room, and adding video game emulators to it. Well, now it's time to add PINBALL to my emulation fun!
There is a kick-ass pinball simulator/construction set program called "Future Pinball." If you're running Windows you can just go to http://www.futurepinball.com/ and download and install it. But if you're on a Linux machine, like I am with my "media center" then you need to get a custom installation script here: http://fprelease.free.fr/fpwine/
Just run that script and it will create a custom WINE install just for Future Pinball. Initially I tried following instructions I found in the Ubuntu forums for putting it in my existing WINE install, but every table I tried to run complained of script errors and froze. The install from that handy, dandy script, though worked perfectly out of the box. So I'd highly recommend it.
Make sure to go to the Future Pinball web site (http://www.futurepinball.com/) to get the "Sci-Fi Classic" demo game. It's actually pretty good, and some other tables people have created require it be installed so their table works. You'll be putting the files into a subfolder located at:
~/.fpwine/drive_c/Games/Future Pinball/Tables
You need to extract them to there (can't be ZIP files), and while many will work just fine in the sub-folders extracting creates, some will only run if the files are no lower than the /Tables folder. Especially the ones that require the demo table be there alongside them, however when you open them in the editor it will TELL you it needs files from another table. Then either copy that table's files in with the new one, or pull those tables out to live with the one on which they are dependent. If you have tables that didn't complain about dependency that freeze or crash on you, they tend to only do it when you want to PLAY them. Some can be fixed simply by opening them in the editor and saving them. Others will need to be moved out of their sub-folders to run. It can be a bit picky, but you only need to set this up once.
Since "demo" tables aren't that much fun, so you'll probably want a REAL table - by which I mean a faithful recreation of a classic one. Go to IRP Pinball site (http://irpinball.org/fp.htm) and look for your favorite olde tyme table. Don't stray off the page of that link I gave you, that's the Future Pinball stuff. Everything else on that site is for Visual Pinball (a different program). For some other recreations and original tables pay visits to the following sites and make off like you just knocked over an arcade:
http://www.blindmankind.tecnopinball.org/
http://www.roneypinball.com.ar/TablesRP.html
http://www.pinballaddicts.com/index.php?option=com_remository&Itemid=26
http://www.scapinosvpins.com/FuturePinballHome.htm
I'd highly recommend test-running each game (hit F5 within the FP editor) and doing that while still in "windowed" mode, just in case a table freezes you don't want to be stuck with it fullscreen and no way to get out of it aside from a hard restart. You'll probably want to play these full-screen, in which case (from within the FP editor) go to "Preferences->Video Options/Rendering" and look for the "Fullscreen" checkbox. You can also tell it whether you've got an older 4:3 "square" screen or a "widescreen" TV/monitor.
Ok, so if you're still with me you've got Future Pinball running smoothly in WINE, you've got an arcade's worth of machines to play - but it's a real drag having to open each in the EDITOR and then play it from there - especially when all you want to do is play them!!
Ideally, what you want to do is double click on a game name and have it run the game, ready to play, right? If you're setting it up to launch from XBMC like I am, you'll absolutely HAVE to do this.
Download the "Future Pinball Wrapper" program:
http://www.spacefractal.com/files/App/FuturePinballWrapper.zip
Extract the contents to your Future Pinball install:
~/.fpwine/c_drive/Games/Future Pinball/
Now, here's the tricky part. You need to SCRIPT this puppy to grab a Table file and run it with this Wrapper program. It will still launch the editor, but it will send it the command to "Play" it too.
When you used the install script for Future Pinball it created a file named "runFP" that will do nicely for our purposes. It is located at just inside your (hidden) ~/.fpwine folder. Copy that file and open it in your favorite text editor. I do this by hitting ALT+F2 and typing:
gedit ~/.fpwine/runFP
Now, you're going to see about 4 lines of code in that file, which is a simple little bash script. We're only going to modify the last line! So, find where it says:
WINEPREFIX=/home/user/.fpwine WINEDEBUG=-all wine /home/user/.fpwine/drive_c/"Games"/"Future Pinball"/"Future Pinball.exe"
(note: "user" is whatever your user name is)
Change it to something like this:
WINEPREFIX=/home/user/.fpwine WINEDEBUG=-all wine /home/user/.fpwine/drive_c/"Games"/"Future Pinball"/"Future Pinball Wrapper.exe" "C://Games//Future Pinball//Tables//Sci-Fi Classic.fpt"
Now, save as or save and rename that file to something like "Sci-Fi Classic" and check the permissions that it is executable. Put the file somewhere convenient, and now all you need to do is double click that file and it will automatically load and launch the Sci-Fi Classic Pinball Table. Oh, and you may need to click your mouse before you can play. It appears (on my system anyway) that the "focus" is still on whatever is underneath the game. Even though, when it is popped fullscreen, I don't see the mouse pointer a quick click or two seems to register as being "on" that window and then my keyboard input works to actually play the game.
For each machine you install just change the end of the path to point to a different file, save the script with a new name, and in the end you'll have a collection of custom launcher scripts for each pinball table you want to play. If you want to go a step further, most tables also include a screen shot of them and you could put that on as the icon for the file to make it pretty if you like.
Lastly, to launch them from within XBMC just use the "Launcher" plug-in I've been talking about now for a while, and tell it to run your custom script like a "stand alone" program.
Now, if you'll excuse me, I have some Pinball to play!
I've been writing the last couple of months on this blog about setting up my XBMC "media center" PC in the living room, and adding video game emulators to it. Well, now it's time to add PINBALL to my emulation fun!
There is a kick-ass pinball simulator/construction set program called "Future Pinball." If you're running Windows you can just go to http://www.futurepinball.com/ and download and install it. But if you're on a Linux machine, like I am with my "media center" then you need to get a custom installation script here: http://fprelease.free.fr/fpwine/
Just run that script and it will create a custom WINE install just for Future Pinball. Initially I tried following instructions I found in the Ubuntu forums for putting it in my existing WINE install, but every table I tried to run complained of script errors and froze. The install from that handy, dandy script, though worked perfectly out of the box. So I'd highly recommend it.
Make sure to go to the Future Pinball web site (http://www.futurepinball.com/) to get the "Sci-Fi Classic" demo game. It's actually pretty good, and some other tables people have created require it be installed so their table works. You'll be putting the files into a subfolder located at:
~/.fpwine/drive_c/Games/Future Pinball/Tables
You need to extract them to there (can't be ZIP files), and while many will work just fine in the sub-folders extracting creates, some will only run if the files are no lower than the /Tables folder. Especially the ones that require the demo table be there alongside them, however when you open them in the editor it will TELL you it needs files from another table. Then either copy that table's files in with the new one, or pull those tables out to live with the one on which they are dependent. If you have tables that didn't complain about dependency that freeze or crash on you, they tend to only do it when you want to PLAY them. Some can be fixed simply by opening them in the editor and saving them. Others will need to be moved out of their sub-folders to run. It can be a bit picky, but you only need to set this up once.
Since "demo" tables aren't that much fun, so you'll probably want a REAL table - by which I mean a faithful recreation of a classic one. Go to IRP Pinball site (http://irpinball.org/fp.htm) and look for your favorite olde tyme table. Don't stray off the page of that link I gave you, that's the Future Pinball stuff. Everything else on that site is for Visual Pinball (a different program). For some other recreations and original tables pay visits to the following sites and make off like you just knocked over an arcade:
http://www.blindmankind.tecnopinball.org/
http://www.roneypinball.com.ar/TablesRP.html
http://www.pinballaddicts.com/index.php?option=com_remository&Itemid=26
http://www.scapinosvpins.com/FuturePinballHome.htm
I'd highly recommend test-running each game (hit F5 within the FP editor) and doing that while still in "windowed" mode, just in case a table freezes you don't want to be stuck with it fullscreen and no way to get out of it aside from a hard restart. You'll probably want to play these full-screen, in which case (from within the FP editor) go to "Preferences->Video Options/Rendering" and look for the "Fullscreen" checkbox. You can also tell it whether you've got an older 4:3 "square" screen or a "widescreen" TV/monitor.
Ok, so if you're still with me you've got Future Pinball running smoothly in WINE, you've got an arcade's worth of machines to play - but it's a real drag having to open each in the EDITOR and then play it from there - especially when all you want to do is play them!!
Ideally, what you want to do is double click on a game name and have it run the game, ready to play, right? If you're setting it up to launch from XBMC like I am, you'll absolutely HAVE to do this.
Download the "Future Pinball Wrapper" program:
http://www.spacefractal.com/files/App/FuturePinballWrapper.zip
Extract the contents to your Future Pinball install:
~/.fpwine/c_drive/Games/Future Pinball/
Now, here's the tricky part. You need to SCRIPT this puppy to grab a Table file and run it with this Wrapper program. It will still launch the editor, but it will send it the command to "Play" it too.
When you used the install script for Future Pinball it created a file named "runFP" that will do nicely for our purposes. It is located at just inside your (hidden) ~/.fpwine folder. Copy that file and open it in your favorite text editor. I do this by hitting ALT+F2 and typing:
gedit ~/.fpwine/runFP
Now, you're going to see about 4 lines of code in that file, which is a simple little bash script. We're only going to modify the last line! So, find where it says:
WINEPREFIX=/home/user/.fpwine WINEDEBUG=-all wine /home/user/.fpwine/drive_c/"Games"/"Future Pinball"/"Future Pinball.exe"
(note: "user" is whatever your user name is)
Change it to something like this:
WINEPREFIX=/home/user/.fpwine WINEDEBUG=-all wine /home/user/.fpwine/drive_c/"Games"/"Future Pinball"/"Future Pinball Wrapper.exe" "C://Games//Future Pinball//Tables//Sci-Fi Classic.fpt"
Now, save as or save and rename that file to something like "Sci-Fi Classic" and check the permissions that it is executable. Put the file somewhere convenient, and now all you need to do is double click that file and it will automatically load and launch the Sci-Fi Classic Pinball Table. Oh, and you may need to click your mouse before you can play. It appears (on my system anyway) that the "focus" is still on whatever is underneath the game. Even though, when it is popped fullscreen, I don't see the mouse pointer a quick click or two seems to register as being "on" that window and then my keyboard input works to actually play the game.
For each machine you install just change the end of the path to point to a different file, save the script with a new name, and in the end you'll have a collection of custom launcher scripts for each pinball table you want to play. If you want to go a step further, most tables also include a screen shot of them and you could put that on as the icon for the file to make it pretty if you like.
Lastly, to launch them from within XBMC just use the "Launcher" plug-in I've been talking about now for a while, and tell it to run your custom script like a "stand alone" program.
Now, if you'll excuse me, I have some Pinball to play!
Sunday, February 14, 2010
Joystick Utility for Linux
So, here's the scenario on my Ubuntu Linux system. Every time I unplug a controller and either plug it back in or swap to another one I have to re-calibrate it. Which you have to do since most games and emulators expect the controller to be connected at "/dev/input/js0" so if you switch from a flight sim to a driving game you could leave them both plugged in and use root privileges to temporarily shift whichever one is connected at js1 or js2 (or wherever) to js0, but you're still going to go through recalibration before you start playing. Not that the calibration takes too long, but I'd rather be playing than calibrating, and I wanted a simple way to SAVE my calibrations so I don't have to do the same thing over and over and over.
Now, some of you might be thinking "there's a calibration utility already!" Um, yes, there is. It's called "Joystick Calibrator." And it doesn't work very well (if at all). Breeze through some Linux gaming forums and more often than not you'll see posts advising those having problems with joysticks to uninstall "Joystick Calibrator" because it can interfere (apparently) with other joystick stuff. What does seem to flawlessly work on Linux are "jscal" and "jstest" - but they are command-line only within a terminal, and don't SAVE your configurations!
Here's my solution: a simple bash script utility with a zenity UI that lets you recall calibrations for all your controllers! It will even simplify the task of shifting any connected controller to the golden "js0" spot!
Just copy the stuff below into a text file, save it and then set its permissions to allow you to "execute" it as a program. As the comments in it say, you'll have to plug in each controller in turn, run "jscal -c" on it, then "jscal -p" to get the calibration settings, copy and paste those INTO this bash script, and (of course) edit it so the options refer to whatever controllers you use. If you don't have "zenity" installed, it should be available in your distro's repositories.
(in case you're wondering, the "jscal -s" calibrations below are for a Gravis Eliminator flight stick, a Thrustmaster Pro Digital NASCAR driving wheel, and a Thrustmaster F2 Ferrari wheel).
Now, some of you might be thinking "there's a calibration utility already!" Um, yes, there is. It's called "Joystick Calibrator." And it doesn't work very well (if at all). Breeze through some Linux gaming forums and more often than not you'll see posts advising those having problems with joysticks to uninstall "Joystick Calibrator" because it can interfere (apparently) with other joystick stuff. What does seem to flawlessly work on Linux are "jscal" and "jstest" - but they are command-line only within a terminal, and don't SAVE your configurations!
Here's my solution: a simple bash script utility with a zenity UI that lets you recall calibrations for all your controllers! It will even simplify the task of shifting any connected controller to the golden "js0" spot!
Just copy the stuff below into a text file, save it and then set its permissions to allow you to "execute" it as a program. As the comments in it say, you'll have to plug in each controller in turn, run "jscal -c" on it, then "jscal -p" to get the calibration settings, copy and paste those INTO this bash script, and (of course) edit it so the options refer to whatever controllers you use. If you don't have "zenity" installed, it should be available in your distro's repositories.
(in case you're wondering, the "jscal -s" calibrations below are for a Gravis Eliminator flight stick, a Thrustmaster Pro Digital NASCAR driving wheel, and a Thrustmaster F2 Ferrari wheel).
#!/bin/bash
#
# Before running this utility you need to populate the data!
# From a terminal run: jscal -c /dev/input/js0
# Follow on-screen instructions to calibrate controller
# From terminal type: jscal -p /dev/input/js0
# Copy the line it returns and paste it where you see the "jscal -s" lines below
# Do this for every controller you plan to use
zenity --info --text "GAME CONTROLLER PRESET\nThis utility lets you select a calibration for a game controller."
joy=$(zenity --list --text "Game Controller Input" --width "320" --height "240" --radiolist --column "Pick" --column "/dev/input/" TRUE "js0" FALSE "js1" FALSE "js2" FALSE "js3" FALSE "js4"); echo $joy
if [ $joy != "js0" ]; then
zenity --question --text "Shift controller to js0?"
q=$?
if [ $q = "0" ]; then
gksudo ln -s /dev/input/$joy /dev/input/js0
fi
fi
# Enter the Names of your Controllers where it says ">>PUT NAME HERE<<"
# Add or remove entries as needed in format:
# TRUE|FALSE # "Controller Name"
cal=$(zenity --list --text "Game Controller Preset" --width "425" --height "275" --radiolist --column "Pick" --column "#" --column "Controller" TRUE 1 ">>PUT NAME 1 HERE<<" FALSE 2 ">>PUT NAME 2 HERE<<" FALSE 3 ">>PUT NAME 3 HERE<<"); echo $ans
# For each option above have an IF entry below
if [ $cal = "1" ]; then
# CONTROLLER 1
jscal -s 6,1,0,125,125,16776704,14509582,1,1,128,128,15338701,11930101,1,1,87,87,6170742,4098126,1,0,120,120,5368545,5592235,1,0,0,0,536854528,536854528,1,0,0,0,536854528,536854528 /dev/input/$joy
fi
if [ $cal = "2" ]; then
# CONTROLLER 2
jscal -s 3,1,0,124,124,9256113,6100620,1,0,254,254,2113601,-2147483648,1,0,255,255,4793344,-2147483648 /dev/input/$joy
fi
if [ $cal = "3" ]; then
# CONTROLLER 3
jscal -s 5,1,0,-144,-128,2033540,1525155,1,0,255,255,2105312,-2147483648,1,0,255,255,2105312,-2147483648,1,0,0,0,536854528,536854528,1,0,0,0,536854528,536854528 /dev/input/$joy
fi
Tuesday, February 9, 2010
XBMC Emulation Station
Last month I wrote a couple of posts about setting up XBMC on an Ubuntu Linux-based system as my Media Center/HTPC computer. After living with it for a while now I'm lovin' it! It's similar to - actually better - than when I had digital cable TV and "on demand" service. However, it remains a work in progress.
I also previously wrote about getting my favorite old Windows 95/98 driving game, BreakNeck, running in WINE so I could launch it from XBMC. I also got the ol' DOS "Tie Fighter" game running too. I probably started with the more difficult way to launch games by picking PC programs that require a CD-ROM in the drive - especially when I wanted to simplify my life by not having to swap the discs and just have the software swap iso images of the CDs. That, as I found out, required writing a custom executable script to do what you would normally type into a terminal window.
 My "Launcher" screen in XBMC
I've heard all this stuff about MAME, the Multi-Arcade Machine Emulator, and thought I'd check it out. So I installed "mame-sdl" from the repositories and "kxmame" as a front-end to make it easier to configure and launch games. I also noted that KXMAME can act as a front-end for MESS, so I added that too. I'd read tons of comments about "xmame" being terribly outdated, and that the SDL version was the way to go. I actually had some success with mame-sdl from the repositories, but when I ran into some issues and really started looking online for solutions I discovered that - for whatever reasons - the MAME stuff in the Ubuntu repositories is positively ancient and no longer being updated!! That led me to this web site: http://journalxtra.com/2009/11/how-to-install-sdlmame-and-sdlmess-onto-ubuntu/ with instructions on how to get the current SDL version of MAME and a slightly less current version of MESS (the Multi-Emulator Super System) to go with it.
Get SDL MAME here: http://sdlmame.wallyweek.org/
Get SDL MESS here: http://apt.ludomatic.fr/
Ah! But in order to install "sdlmame" (the newer, but not newest one) I had to uninstall "mame-sdl" which also took "kxmame" with it. Which had me thinking I needed a more current alternative to KXMAME that would (ideally) run both MAME and MESS. And I found it without too much trouble, it's called "Wah!cade" and you can find out how to get it at: http://www.anti-particle.com/wahcade.shtml. It is a linux version of "MAMEwah" written in python. Setting up MAME with it is really easy. Setting up MESS is a little less obvious, but I eventually figured it out.
But then I ran into some problems with MESS. While I could get various emulations to run, I couldn't get any of them to actually run a program. I think there's something to be said for focusing on one thing and doing it well, rather than trying to do everything and accomplishing nothing. After messing with MESS for most of an afternoon I decided it wasn't worth the effort to try and figure out why it refused to run perfectly good programs. A second problem was that nothing I did would make the XBMC Launcher plugin actually launch the Wah!cade front-end. I suspect it's because there is no compiled binary for it, it's a Python script - and XBMC is powered by Python scripts. I didn't look at the crash logs, but I'm guessing XBMC mistook "Wah!cade" as a script it was supposed to run and then couldn't figure out what to do with it.
Well, then it occurred to me that I really don't NEED something like "Wah!cade" anyway because XBMC can be my front-end for emulated retro gaming.
I had no problem setting up the XBMC Launcher plugin for running MAME. In fact, now that I think of it, the first screenshot I saw of the Launcher plugin in use had a thumbnail for MAME right there. D'oh! I suspect if I'd been able to get MESS to function correctly it would have similarly been easy to configure for use via XBMC, but I decided to use dedicated emulators for Commodore and Atari that are known to be very, very good at what they do.
So, next I set up the Commodore 64 emulator VICE too. The "Launcher" plugin for XBMC was actually intended more for programs like VICE as the plugin has two options - to either launch an application binary OR to launch a file in another program (i.e., a ROM file in an emulator). So that's super easy to set up once you get it pointing to the actual binary file (which is "etc/bin/x64" btw).
Then I downloaded the great Atari 2600 emulator "Stella" and set that up in a similar fashion. For both VICE and Stella it populates a sub-directory where you have all your games. Then, if you want, you can fiew them as "Thumbnails" and use the "Get Thumb" option from the Right+Click menu to find a suitable image for the game (such as box art, a screen shot, or a scan of the cartridge). That makes XBMC a really slick, unified front-end application for any number of emulator programs.
 "Atari" section with customized thumbnails showing cartridge images
The next issue was that when VICE launches it would cover the screen, and with the right video settings I could hit "ALT+D" and get it to pop out of the window frame at full screen size - but it wasn't TRUE fullscreen because the menu bar and status bar were still there! On a Windows system popping VICE fullscreen is really, truly full screen (no menu bar, no status). Looking around online I found that this is a long-standing issue with VICE on Linux, and (surprise, surprise) the version in the official Ubuntu repositories is outdated. I learned there is a new SDL version that will actually solve the fullscreen problem - but you have to build it from source. That had me scared because:
a) I've had limited success building programs from source
b) I've read pages of forum posts by people who couldn't get VICE to compile
But I decided to risk it if the potential payoff was working fullscreen. First of all you need to GET the correct source files for VICE 2.2 then you need to follow the instructions in this post: http://ubuntuforums.org/showthread.php?t=278022 and where it talks about adding options to the "./configure" command you will need to include "--enable-sdlui" (if you select contradictory options it will warn you so you can choose. For example, you can't select both --enable-sdlui and --enable-gnomeui). Oh, and make sure you install the SDL dev stuff from the Ubuntu repositories or it won't compile (it will error out telling you it can't find any of the SDL stuff it needs). It will take you 15 minutes or so to configure, make, and install it, so be patient. Much to my pleasant surprise I compiled it without any problems!
Interestingly, when you run the install it doesn't put all the files in the same places as the older version from the repos - which meant I had TWO versions of VICE installed and could choose to run either (one puts binaries in /usr/bin and the other were in /usr/local/bin). The moment of truth was running it. At first it opens VERY, VERY small. There is no menu bar and, unlike the default user interface (by which I mean if you compile without any custom options) you can't just right+click to get menus. Nope, this SDL one is a different animal. Hit F12 and you'll be taken into the options. Navigate with the arrow keys and the "backspace" key. Because it was so tiny on my screen, and I was looking at it on a low-res TV screen, I had to sort of squint and guess I was selecting the options to "double" the size (which allowed me to actually READ the options) and then I enabled "fullscreen" and bingo! True full screen, with no window frames, menu bars, or status.
XBMC needs to be pointed to the new VICE 2.2 binary file or it will continue launching the old version. You could go in and "remove" the existing Launcher item and add the new one, but that will force you to re-import your C64 software library, and if you spent any time making things pretty with thumbnails you'll need to re-do all of them. So, I'd recommend you just go edit the XML file: ~/.xbmc/user data/plugin data/programs/launcher/launchers.xml and open it in gedit (Text Editor) scroll down until you find the entry for VICE and edit the path so it points at the newer version's binary file. Incidentally, the Launcher plugin doesn't always find great thumbnail images for you - it only gives you a maximum of 10 options from a Yahoo image search and a lot of them probably suck. This XML file is also where you can point the Launcher item thumbnails to any image you have stored anywhere on your computer (the default location for Launcher thumbnail images is ~/.xbmc/user data/User Data/Thumbnails/Programs/ (which you may notice is NOT the more obvious "Thumbnails" folder a level higher up).
So, there you have it. XBMC as a slick front-end to WINE, MAME, VICE, and Stella - and can be for other emulators as well.
EDIT: Screenshots added
I also previously wrote about getting my favorite old Windows 95/98 driving game, BreakNeck, running in WINE so I could launch it from XBMC. I also got the ol' DOS "Tie Fighter" game running too. I probably started with the more difficult way to launch games by picking PC programs that require a CD-ROM in the drive - especially when I wanted to simplify my life by not having to swap the discs and just have the software swap iso images of the CDs. That, as I found out, required writing a custom executable script to do what you would normally type into a terminal window.
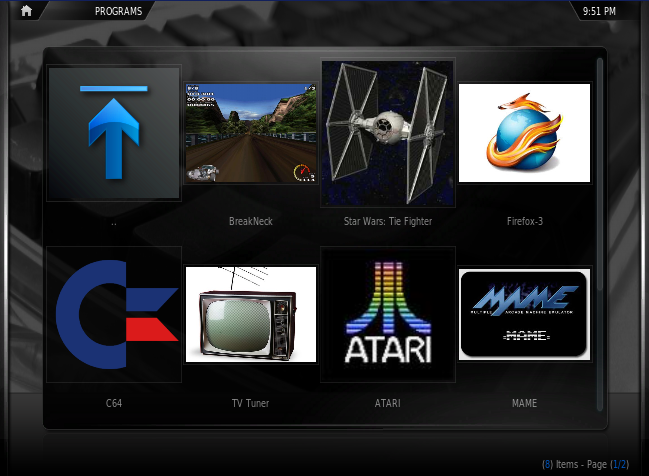 My "Launcher" screen in XBMC
I've heard all this stuff about MAME, the Multi-Arcade Machine Emulator, and thought I'd check it out. So I installed "mame-sdl" from the repositories and "kxmame" as a front-end to make it easier to configure and launch games. I also noted that KXMAME can act as a front-end for MESS, so I added that too. I'd read tons of comments about "xmame" being terribly outdated, and that the SDL version was the way to go. I actually had some success with mame-sdl from the repositories, but when I ran into some issues and really started looking online for solutions I discovered that - for whatever reasons - the MAME stuff in the Ubuntu repositories is positively ancient and no longer being updated!! That led me to this web site: http://journalxtra.com/2009/11/how-to-install-sdlmame-and-sdlmess-onto-ubuntu/ with instructions on how to get the current SDL version of MAME and a slightly less current version of MESS (the Multi-Emulator Super System) to go with it.
Get SDL MAME here: http://sdlmame.wallyweek.org/
Get SDL MESS here: http://apt.ludomatic.fr/
Ah! But in order to install "sdlmame" (the newer, but not newest one) I had to uninstall "mame-sdl" which also took "kxmame" with it. Which had me thinking I needed a more current alternative to KXMAME that would (ideally) run both MAME and MESS. And I found it without too much trouble, it's called "Wah!cade" and you can find out how to get it at: http://www.anti-particle.com/wahcade.shtml. It is a linux version of "MAMEwah" written in python. Setting up MAME with it is really easy. Setting up MESS is a little less obvious, but I eventually figured it out.
But then I ran into some problems with MESS. While I could get various emulations to run, I couldn't get any of them to actually run a program. I think there's something to be said for focusing on one thing and doing it well, rather than trying to do everything and accomplishing nothing. After messing with MESS for most of an afternoon I decided it wasn't worth the effort to try and figure out why it refused to run perfectly good programs. A second problem was that nothing I did would make the XBMC Launcher plugin actually launch the Wah!cade front-end. I suspect it's because there is no compiled binary for it, it's a Python script - and XBMC is powered by Python scripts. I didn't look at the crash logs, but I'm guessing XBMC mistook "Wah!cade" as a script it was supposed to run and then couldn't figure out what to do with it.
Well, then it occurred to me that I really don't NEED something like "Wah!cade" anyway because XBMC can be my front-end for emulated retro gaming.
I had no problem setting up the XBMC Launcher plugin for running MAME. In fact, now that I think of it, the first screenshot I saw of the Launcher plugin in use had a thumbnail for MAME right there. D'oh! I suspect if I'd been able to get MESS to function correctly it would have similarly been easy to configure for use via XBMC, but I decided to use dedicated emulators for Commodore and Atari that are known to be very, very good at what they do.
So, next I set up the Commodore 64 emulator VICE too. The "Launcher" plugin for XBMC was actually intended more for programs like VICE as the plugin has two options - to either launch an application binary OR to launch a file in another program (i.e., a ROM file in an emulator). So that's super easy to set up once you get it pointing to the actual binary file (which is "etc/bin/x64" btw).
Then I downloaded the great Atari 2600 emulator "Stella" and set that up in a similar fashion. For both VICE and Stella it populates a sub-directory where you have all your games. Then, if you want, you can fiew them as "Thumbnails" and use the "Get Thumb" option from the Right+Click menu to find a suitable image for the game (such as box art, a screen shot, or a scan of the cartridge). That makes XBMC a really slick, unified front-end application for any number of emulator programs.
 "Atari" section with customized thumbnails showing cartridge images
The next issue was that when VICE launches it would cover the screen, and with the right video settings I could hit "ALT+D" and get it to pop out of the window frame at full screen size - but it wasn't TRUE fullscreen because the menu bar and status bar were still there! On a Windows system popping VICE fullscreen is really, truly full screen (no menu bar, no status). Looking around online I found that this is a long-standing issue with VICE on Linux, and (surprise, surprise) the version in the official Ubuntu repositories is outdated. I learned there is a new SDL version that will actually solve the fullscreen problem - but you have to build it from source. That had me scared because:
a) I've had limited success building programs from source
b) I've read pages of forum posts by people who couldn't get VICE to compile
But I decided to risk it if the potential payoff was working fullscreen. First of all you need to GET the correct source files for VICE 2.2 then you need to follow the instructions in this post: http://ubuntuforums.org/showthread.php?t=278022 and where it talks about adding options to the "./configure" command you will need to include "--enable-sdlui" (if you select contradictory options it will warn you so you can choose. For example, you can't select both --enable-sdlui and --enable-gnomeui). Oh, and make sure you install the SDL dev stuff from the Ubuntu repositories or it won't compile (it will error out telling you it can't find any of the SDL stuff it needs). It will take you 15 minutes or so to configure, make, and install it, so be patient. Much to my pleasant surprise I compiled it without any problems!
Interestingly, when you run the install it doesn't put all the files in the same places as the older version from the repos - which meant I had TWO versions of VICE installed and could choose to run either (one puts binaries in /usr/bin and the other were in /usr/local/bin). The moment of truth was running it. At first it opens VERY, VERY small. There is no menu bar and, unlike the default user interface (by which I mean if you compile without any custom options) you can't just right+click to get menus. Nope, this SDL one is a different animal. Hit F12 and you'll be taken into the options. Navigate with the arrow keys and the "backspace" key. Because it was so tiny on my screen, and I was looking at it on a low-res TV screen, I had to sort of squint and guess I was selecting the options to "double" the size (which allowed me to actually READ the options) and then I enabled "fullscreen" and bingo! True full screen, with no window frames, menu bars, or status.
XBMC needs to be pointed to the new VICE 2.2 binary file or it will continue launching the old version. You could go in and "remove" the existing Launcher item and add the new one, but that will force you to re-import your C64 software library, and if you spent any time making things pretty with thumbnails you'll need to re-do all of them. So, I'd recommend you just go edit the XML file: ~/.xbmc/user data/plugin data/programs/launcher/launchers.xml and open it in gedit (Text Editor) scroll down until you find the entry for VICE and edit the path so it points at the newer version's binary file. Incidentally, the Launcher plugin doesn't always find great thumbnail images for you - it only gives you a maximum of 10 options from a Yahoo image search and a lot of them probably suck. This XML file is also where you can point the Launcher item thumbnails to any image you have stored anywhere on your computer (the default location for Launcher thumbnail images is ~/.xbmc/user data/User Data/Thumbnails/Programs/ (which you may notice is NOT the more obvious "Thumbnails" folder a level higher up).
So, there you have it. XBMC as a slick front-end to WINE, MAME, VICE, and Stella - and can be for other emulators as well.
EDIT: Screenshots added
Thursday, January 28, 2010
Breakneck / N.I.C.E.2 / Excessive Speed on Linux (PART 1)
"Breakneck" (also known as "N.I.C.E. 2" and "Excessive Speed" in some markets) is an old racing game from the late 1990s. Originally from a German company called "Synetic" it was sold worldwide under the other names via local distributors (in the US it was marketed by "SouthPeak Interactive").
What made this game so kick ass? Well, it had a TON of options. The base game comes with:
10 Track Locations, with multiple variations of most tracks (24 total)
9 Car Classes containing at total of 43 vehicles with 8 possible "Sponsor" graphics/colors.
There are also multiple ways to play the game:
Single Race (my favorite)
Arcade Game (a "First Person Shooter" with armed cars)
Time Attack - Best Race
Time Attack - Best Lap
Multiplayer Mode (create a driver profile, mod your car, find a sponsor, win races for $$)
And we haven't even GOT to the "Options" option on the main menu yet! Here you can set everything from reflections to collisions with trees to enemy skill and gravity. You can also decide whether the cars "deform" or not. In some other racing games the cars don't dent, which is mostly because they use actual makes and models and the manufacturers don't particularly want their vehicles all banged up in the game, and there's also the issue of morons who might think the damage is based on real-world crash data. Wow, are they in for a surprise when they rear-end another car at 180 MPH and can't just drive away from it!
BreakNeck uses "fake" cars. They have bogus names and manufacturers, but if you ignore the obvious alterations to grills and lights you can usually figure out what they're actually supposed to be. Sometimes it's fun to just race the wrong way on the track and see how long you can go before your car is so smashed up it's done. Not the point of the game, but a great way to blow off some steam for sure!
Another thing that made the game great was the availability of fan-made content. There are car editors, texture editors, and track editors for this game and some people spent a LOT of time creating extra cars, crazy paint jobs, and new variations of the tracks. The editors and extras can be nearly impossible to find now because the game is so old, so I was glad I'd archived mine to a CD-ROM (except for the car editor, which I can't locate).
My game, then, is pimped out with 67 additional tracks (including two new locations - Canada and Italy - which weren't available in the US release); 21 additional cars (some of which are based on actual models). I actually used to have another disc full of even more cars (such as the "Fifth Element" taxi and the "Batmobile") but I lost it. :( The new cars don't necessarily use the boring "sponsor" graphics either.
So, now you may understand why I want to get this old game going again. Actually I have it running on my WinXP machine, but I just set up a Home Theater PC that uses Linux and thought it would be cool to set it up so I could play this game on the TV screen.
"Part 2" of this post has the technical stuff.
What made this game so kick ass? Well, it had a TON of options. The base game comes with:
10 Track Locations, with multiple variations of most tracks (24 total)
9 Car Classes containing at total of 43 vehicles with 8 possible "Sponsor" graphics/colors.
There are also multiple ways to play the game:
Single Race (my favorite)
Arcade Game (a "First Person Shooter" with armed cars)
Time Attack - Best Race
Time Attack - Best Lap
Multiplayer Mode (create a driver profile, mod your car, find a sponsor, win races for $$)
And we haven't even GOT to the "Options" option on the main menu yet! Here you can set everything from reflections to collisions with trees to enemy skill and gravity. You can also decide whether the cars "deform" or not. In some other racing games the cars don't dent, which is mostly because they use actual makes and models and the manufacturers don't particularly want their vehicles all banged up in the game, and there's also the issue of morons who might think the damage is based on real-world crash data. Wow, are they in for a surprise when they rear-end another car at 180 MPH and can't just drive away from it!
BreakNeck uses "fake" cars. They have bogus names and manufacturers, but if you ignore the obvious alterations to grills and lights you can usually figure out what they're actually supposed to be. Sometimes it's fun to just race the wrong way on the track and see how long you can go before your car is so smashed up it's done. Not the point of the game, but a great way to blow off some steam for sure!
Another thing that made the game great was the availability of fan-made content. There are car editors, texture editors, and track editors for this game and some people spent a LOT of time creating extra cars, crazy paint jobs, and new variations of the tracks. The editors and extras can be nearly impossible to find now because the game is so old, so I was glad I'd archived mine to a CD-ROM (except for the car editor, which I can't locate).
My game, then, is pimped out with 67 additional tracks (including two new locations - Canada and Italy - which weren't available in the US release); 21 additional cars (some of which are based on actual models). I actually used to have another disc full of even more cars (such as the "Fifth Element" taxi and the "Batmobile") but I lost it. :( The new cars don't necessarily use the boring "sponsor" graphics either.
So, now you may understand why I want to get this old game going again. Actually I have it running on my WinXP machine, but I just set up a Home Theater PC that uses Linux and thought it would be cool to set it up so I could play this game on the TV screen.
"Part 2" of this post has the technical stuff.
Breakneck / N.I.C.E.2 / Excessive Speed on Linux (PART 2)
. . .Part 2. The Technical Stuff
Ok, first of all to get this game running under Linux you'll need to install Wine. Wine is a Windows compatibility layer for Linux. Most Linux distributions have it in their repositories, and that's really the best way to install it. It can be difficult to compile from source or install manually. So, ok, go do that. I'll wait.
MAKE AN IMAGE
Ah! You're back so soon? Cool. You'll need your Breakneck CD-ROM to install the game. But we're not going to actually use the disc. First of all, it's a pain in the ass to swap CDs in and out. That's so last century! I've also noticed that the game tends to remember which CD/DVD drive it was installed from, because on my system with multiple optical drives the game will only run with the CD in the drive from which I originally installed it. So, what we want to do is make an IMAGE of the CD. This is a really good idea with an old game like this that is out of production - if you damage the CD you're out of luck (unless you find one on eBay I suppose). Here's what to do:
1. Insert the BreakNeck CD in your CD/DVD drive.
2. If it "auto mounts" you need to unmount it! If you see its icon on the desktop just right+click and "unmount" it. If your system isn't set up to show mounted drives on the desktop you need to open a terminal and type "mount" at the prompt. Look for the CD in the list (probably /dev/cdrom). If it's there type (without the quotes) "umount /dev/cdrom" or "umount /media/cdrom" or "umount /mnt/cdrom" depending on what you saw in the list.
3. Create CD-ROM ISO image with dd command (assuming CD is at /dev/cdrom and $ is the prompt):
Ok, first of all to get this game running under Linux you'll need to install Wine. Wine is a Windows compatibility layer for Linux. Most Linux distributions have it in their repositories, and that's really the best way to install it. It can be difficult to compile from source or install manually. So, ok, go do that. I'll wait.
MAKE AN IMAGE
Ah! You're back so soon? Cool. You'll need your Breakneck CD-ROM to install the game. But we're not going to actually use the disc. First of all, it's a pain in the ass to swap CDs in and out. That's so last century! I've also noticed that the game tends to remember which CD/DVD drive it was installed from, because on my system with multiple optical drives the game will only run with the CD in the drive from which I originally installed it. So, what we want to do is make an IMAGE of the CD. This is a really good idea with an old game like this that is out of production - if you damage the CD you're out of luck (unless you find one on eBay I suppose). Here's what to do:
1. Insert the BreakNeck CD in your CD/DVD drive.
2. If it "auto mounts" you need to unmount it! If you see its icon on the desktop just right+click and "unmount" it. If your system isn't set up to show mounted drives on the desktop you need to open a terminal and type "mount" at the prompt. Look for the CD in the list (probably /dev/cdrom). If it's there type (without the quotes) "umount /dev/cdrom" or "umount /media/cdrom" or "umount /mnt/cdrom" depending on what you saw in the list.
3. Create CD-ROM ISO image with dd command (assuming CD is at /dev/cdrom and $ is the prompt):
$ dd if=/dev/cdrom of=/tmp/BreakNeck.iso
That will create the ISO file in your temporary files "/tmp" directory. Just navigate to it and move it where-ever you plan to store CD-ROM images. For example, I put mine in a folder I created in my Home directory: "~/Games/Windows/CDs/"
You can put the original BreakNeck CD-ROM away for safe-keeping.
CREATE A FAKE DRIVE
You'll need to mount the ISO file every time you want to play the game. You'll need your trusty terminal again. Type the following commands (we'll be working as root so you'll need administrative access. "$" represents the prompt):
$ sudo su
$ mkdir /media/iso
$ gedit /etc/fstab
(on that last one if you're using Gnome that works. Or instead of "gedit" put in whatever text editor you prefer to use)
on a new line at the bottom of that file enter this:
/tmp/isolink /media/iso udf,iso9660 ro,user,loop,noauto 0 0
Save the file. That line now creates a link between a temporary file and the media/iso folder we created above.
That's it! Well, almost. We still need the "/tmp/isolink" but we'll create that in the next step.
INSTALL THE GAME
Open up a terminal and type the following:
$ ln -sf ~/Games/Windows/CDs/BreakNeck.iso /tmp/isolink
$ mount /media/iso
Your ISO file is now mounted as if it were the original CD-ROM! You should be able to run the installer just as you would on a Windows machine. You can skip the DirectX install because Wine already has a nearly complete implementation of DirectX 6 built into it. I didn't try any of the DX Media stuff because the running commentary from "Eddie" is hyper annoying.
At this point you should be able to run the "Setup" utility. You can select whatever graphics card you want, it doesn't matter, because we'll HAVE to use the Software Engine. You can either select it in the first drop-down box OR you can just check the "Software Engine" checkbox. Don't bother playing with any of the other options, except make sure "SoundFX" is checked. Force Feedback won't work, so you can ignore the radio buttons at the bottom. Click "Benchmark" to make sure the settings work, and to see if the frame rate is high enough. If it isn't, you'll need to either dial down the resolution (lower the smoother) and/or the bit-depth (32 to 16). If all goes well you can then test play the game.
UPDATE: Ubuntu 10.04 Lucid Lynx / Linux Mint 9
With the latest versions of Ubuntu (and derivatives) there is now a "ExecutableBit" security policy in place by default that blocks .EXE files on CD-ROMs, DVDs, and mounted ISO images from being marked as executable/trusted, so you can no longer just double click on such files and have them run in Wine. :(
In order to install BreakNeck from the CD-ROM (or the mounted ISO image of it) you will need to either press ALT+F2 to get a "run" window or open a Terminal and type:
$ wine /media/iso/setup.exe
Once the program is installed, however, the EXE file being executed is installed to the Wine "C:" drive as a trusted executable, so if you want to play the game directly (without XBMC being involved) you'll need to run the game from the Main Menu entry or you'll need to execute the launch script explained in the next section, which will be treated the same as typing the commands in a terminal.
CREATE A LAUNCH SCRIPT
Normally you won't be able to just click on the game icon on your desktop or in your main menu and play the game because it is going to want your CD in the drive! So, let's create a script that will "insert" the virtual CD in the fake drive and then launch the game for us!
Open up a text editor and type in the following (replace "username" with your login name):
umount /media/iso
rm -r /tmp/isolink
ln -sf ~/Games/Windows/CDs/BreakNeck.iso /tmp/isolink
mount /media/iso
env WINEPREFIX="/home/username/.wine" wine "C:\Program Files\SouthPeak Interactive\BreakNeck\breakneck.exe"
Explanation:
Line 1 makes sure no other ISO files are mounted.
Line 2 removes the "isolink" file because the next line can't always overwrite it properly.
Line 3 creates the "isolink" file pointing to the desired ISO file.
Line 4 mounts the ISO file to our fake drive
Line 5 launches BreakNeck in Wine.
Save the file with whatever name you want (something like "BreakNeck" is good) and then right+click on it and under the Permissions make sure it is "executable."
Here's the cool part: Copy that file and edit it to mount different ISO files and launch other programs and the scripts will do the virtual CD-swapping for you - always making sure the correct CD image is in the virtual drive.
I should note that this method only works with games that require a single CD be in the drive. I haven't tackled games that want you to swap out CDs during the game.
CONFIGURE WHEEL
Odds are you don't want to drive your car with the arrow keys on the keyboard. You probably also don't want to drive with a joystick (but you can if that's all you've got), but I'm going to talk about setting up a wheel. Specifically a Thrustmaster wheel since I have two different ones I tried.
1. Do not, I repeat NOT, install the drivers/utilities for your game controllers in Wine. They simply will not work because Wine gets the game controller configurations from Linux.
2. Plug your controller into a USB port. If you have an old "game port" controller you're probably SOL - I couldn't get the one I had to work. I would highly recommend you only plug ONE controller in - the one you want to use - for best results.
3. Open up a terminal and type:
$ sudo apt-get update
$ sudo apt-get install joystick
$ jstest --normal /dev/input/js0
(on that line you may have to try js0, js1, js2, etc. to find your controller - and if you plug and unplug devices in different orders they'll get different assignments)
Once you've located where your desired controller is mounting, we need to calibrate it! In the terminal again (example is if your controller mounted as /dev/input/js2):
$ jscal -c /dev/input/js2
The terminal will prompt you to do stuff with the controller. Do it and your controller will be calibrated. This calibration will carry over into BreakNeck running in Wine. Or at least is should.
2. Download joysticktester.exe to test your controller within Wine. You may discover that an axis is reversed, or that the buttons have enumerated differently than they're labeled. Make note of anything goofy and if it's an axis issue you should be able to just calibrate it in reverse by running the "jcal -c" command again and switching what you told it was the "maximum" and "minimum" limits.
3. If you're seeing your controller in Joysticktester within Wine. You're ready for the next step! If not, you may need to change the permissions for the /dev/input/js* files. Since those files are automatically created changing permissions on the files themselves won't stick - you need to add your main user to the "plugdev" group to automatically get read-write access to any js files the operating system makes. You normally shouldn't need access to the /dev/input/event* files and if you do change the permissions it will screw up the controller names in Wine (for example if I change permissions on /dev/input/event4 - which is linked to /dev/input/js0 - then in BreakNeck it will stop reporting my controller as "Thrustmaster Pro Digital" and call it "/dev/input/event4" in the "Controls" setup. It will still WORK, mind you, but it shouldn't be necessary to do that.
4. Run your launch script and go to the "Controls" entry on the main menu in the game. You should see your controller, by name, listed under the options. Tell it the correct TYPE of controller (keyboard, wheel, joystick, etc.). You may notice the X,Y,Z axis settings are BLANK! Whatever you do, do NOT try to assign them within BreakNeck. Not only will it NOT work, it will disable the axis settings and you'll have to do a registry hack to fix it. You CAN, however, change button assignments without worry. Some buttons, though, may be dead - but if you did the Joysticktester.exe test you already knew that.
5. AXIS FIX - if for some reason you still can't steer and or your gas/brake doesn't work or if you accidentally tried to assign an axis in the game controls settings you'll need to fix it manually. You'll also may need a working copy of the game running on a Windows system to do it! Ok, the simple fix is navigate to: ~/.wine/Windows/regedit.exe then navigate to:
HKEY_LOCAL_MACHINE\SOFTWARE\SYNETIC\HAND\V2\Input
If the "Input" folder doesn't exist, just create it. If you're lucky it's already there.
A. If the "Input" folder is already there you should have an entry for your controller by name. The "value" string will be a long sequence of binary number data. For a Wheel controller the first two sets should be "02 01" so if they are "00 00" just edit them and your controller should now work.
B. If the "Input" folder is missing, or has no entries in it, you'll need the data from a working Windows machine. Using Regedit get the string data. You can just "export" the Input key and then "import" it to your Wine registry and that should fix it.
LAUNCH FROM XBMC (optional)
I'm setting this up on my Home Theater PC so I want to be able to launch the game from inside my media center interface. I installed the "Launcher" programs plugin from the SVN repository and created a launcher pointing to my custom script. Works beautifully!
Happy Racing!
Thursday, January 14, 2010
Adventures in building an HTPC

But the obvious "future" of television is the complete convergence of the Internet and Television. They (the mysterious "they" who know all, see all) have been telling us for years that is what's going to happen, but the TV networks are obviously resistant to it, lest they go the way of so many newspapers. You can now get shows on Hulu.com from half a dozen networks, and the ones who aren't there provide them on their own web sites. That's if you like professionally produced corporate sanctioned content. There are, of course, tons of amature videos out on the Web too, and it's not unheard of for "made for web" content to be high quality too (I'm looking at you "Dr. Horrible's Sing-Along Blog").
My desktop computer sits in a corner of the living room and has a graphics card in it with S-Video output. I ran long audio and video lines around the edge of the room so I can switch the living room TV to the "Line Input" and have my computer set up to use the TV screen as an additional monitor. For years now I've been dragging media players and browser windows over to the TV and popping them full screen. That's also how I play DVDs. I've never actually owned a stand-alone DVD player since I could just use the one in my computer on the living room television. While this is kind of cool, it does tie up my desktop computer as a "media center."
So, I thought, why not just HAVE a dedicated media center computer? Well, cost is part of the reason. So I asked some friends and family for their broken or obsolete compters and components just to see if I could manage to build up a workable HTPC ("Home Theater PC" or "Media Center PC" if you prefer) out of cast-off parts. Here's what I ended up with:
Full ATX tower with a 500 W power supply
1.25 GB DDR Memory
Abit IS7-E2 motherboard
Pentium 4 CPU
ATI Radeon X1300 Graphics card (2 DVI ports, 1 S-Video output)
ATI TV Wonder Pro Tuner Card (Coax and S-Video inputs)
DVD-ROM drive
DVD+RW drive
Floppy Drive
Microsoft wireless keyboard and mouse
80 GB Seagate SATA Hard Drive
For the underlying operating system I wanted something stable and free so I went with the Ubuntu 8.04 LTS "Hardy Heron" version of Linux, and installed XBMC (X-Box Media Center) on top of that. Which all sounds well and good, except that's my FINAL configuration. It took a week of failed attempts to find hardware/software combinations that would actually work together.
Attempt #1
Installed the XBMC Live 9.04 to the drive. Included ATI drivers didn't work. Underlying system is Ubuntu with Flux (which I hate) and X-server conflicts or frankly I'm not sure what all - I just couldn't get it to work. I could run XBMC windowed in Flux, but couldn't make it work fullscreen nor get TV-out to work. DVD playback also wouldn't work. Wiped the drive, time to start over.
Attempt #2
Installed the XBMC Live 9.11 to the drive. Same results as the older version, except a second attempt to install legacy ATI drivers screwed up the system so badly I couldn't get anything to work. Wiped the drive started over.
Attempt #3
Decided I needed to forget the prebuilt live cds and build a live system myself. Following instruction for "XBMCbuntu" I installed the minimal version of Ubuntu "Karmic" and got XBMC installed on top of that. I decided it would be easier to configure things if I installed an underlying desktop system, so I went with XFCE since it's light-weight. After fighting with various configuration issues and repeatedly having to install additonal software just to do that I realized I probably just should have started with Xubuntu. So I wiped the drive again.
Attempt #4
Installed Xubuntu "Karmic" and put XBMC on top of that. Had problems with the ATI drivers though. The Radeon X1300 is no longer supported by the drivers from ATI so I had to use the Open Source drivers, but the TV output support on that is not quite fully baked yet. I couldn't install the older ATI drivers that did support the card because they don't work on the X-Server used by Karmic. So I had to decide if I was going to try and "downgrade" the X-Server or if I should just downgrade to an older version of *buntu that had a compatible X-Server already. I opted for the latter. Wiped the drive once again.
Attempt #5
Decided to just go with the most "vanilla" option and installed Ubuntu "Hardy" 8.04 Long Term Support on the drive. It's stable and problems are well documented in the support forums, often with multiple solutions. The Proprietary ATI drivers offered up by Ubuntu ended in a "White Screen of Death." If I disabled direct rendering I could get a usable desktop, but XBMC requires direct rendering for OpenGL so I HAD to have it working. I tried using the EnvyNG installer and forgot to remove the drivers installed by Synaptic first, which led to some install errors and a broken X-Server that I tried and tried to reconfigure, but whatever got hosed up it was bad. Got mad, wiped the drive and started over. Again.
Attempt #6
Again, with the same version of Ubuntu, only this time I didn't install the drivers presented by Ubuntu, and I didn't use EnvyNG. I went to the AMD/ATI web site and found the last driver (Catalyst 9.2) that supported my card and downloaded it. Backed out to a command line, stopped the X-Server, and ran the installer. That got me to a desktop, and I could run the Catalyst Control Center for the ATI card, but it reported it was using the "mesa" software acceleration for OpenGL. XBMC didn't care for that - in fact it refuses to run. I was able to get DVDs to play, even full screen, and could choose between the monitor and the TV, but not both at once. I later realized it was because the DVI-0 and S-Video ports are "shared" so you have to pick and choose. However, when I moved the monitor to DVI-1 so I could have cloned video on both screens the auto-detection would default to using the VESA drivers! I went through several guides online on how to "fix" various ATI issues on Linux and eventually got to a point where I could either have XBMC working, but DVD playback was just a black screen or get DVD playback working and XBMC was a black screen. It seemed no matter what I did I could never get them both to work.
Attempt #6.5
After spending a couple days trying to sort it out I uninstalled everything ATI from the system and booted with the VESA drivers. I downloaded the next older ATI driver from the AMD/ATI web site and installed that. When I ran the installer I made sure the monitor was connected on DVI-1 and the TV was on and connected to the S-Video port. FINALLY the configuration worked! I had cloned video on both screens, I had hardware accelerated OpenGL graphics for XBMC, and DVDs would play full screen.
The next issue was to get the ATI Wonder Pro TV Tuner working. XBMC actually doesn't have ANY support for TV tuners! Crazy, huh? The recommended solutions are to either use XBMC as a "front end" to access a MythTV server (MythTV is sort-of an open-source Tivo thing), or use a program called "TVheadend" which can create a "media stream" for TV tuner channels that XBMC can be configured to play. The "TVheadend" routes sounded easier so I tried that first.
I was getting errors such as "/dev/video0 doesn't exist" because Ubuntu auto-detects the hardware for video capture and the device map isn't even created unless the device is detected as usable. Without a signal source a TV card is useless, so Ubuntu would just pretend it wasn't there. Once I realized that and rebooted and the /dev/video and /dev/video0 existed. I eventually created the files manually as root and now they "stick" even when the card doesn't have a signal. In order to ACCESS the card I needed to go into the "Authorizations" control panel and release access to the device and then, with the "Users & Groups" make sure my user account was part of the "video" group. Failing to do those things resulted in "access denied" permissions errors. But there was another problem (I'll get to in a moment). Oh, and since it is an analog capture card and TV broadcasting over the air has all gone digital, I had to connect it to the Cable TV coax to make it work.
TVheadend wouldn't work for me. In reading the FAQ on the developer's site I found out it only supports the PAL broadcast standard for analog TV capture cards. Since I'm in the United States I needed something that could work with NTSC.
So the other alternative is MythTV. I hadn't heard good things about it. I'd heard it was difficult to set up and the interface sucked. The criticisms were correct. The installer failed to set up the SQL server backend and I had to manually configure it. The front-end interface is as clunky as I'd heard, especially after the slick "Confluence" interface of XBMC 9.11. MythTV's setup showed my card by the correct name and let me select it, but then acted like it didn't exist. I never did get MythTV to work and uninstalled it.
It would be nice if I could also record live TV shows to the hard drive (something MythTV is designed to do) but the hard drive is only 80 GB, which is far too small a capacity for real duty as a DVR. But I figured if I could get it working maybe I'd pick up a larger drive in the future. So far I haven't been able to get Gstreamer, Transcoder, or Mencoder to record from the card. The closest I've gotten is white noise sound and a scrambled picture. I've decided it's not worth my time to try and get a feature working I'll likely never use.
I realized that I didn't actually NEED the ability to record TV shows. I know if I miss a show I can usually catch it online anyway, so I literally haven't recorded a TV show in YEARS. All I really needed was the ability to watch live TV! I reasoned that if I could find a TV Tuner program that would see the card I could just "launch" it from within XBMC. I knew there were launchers for game emulators, and a generic one to launch any binary so I just needed the tuner program.
KDETV was my first stop. It saw the card, but the channel scanning wizard didn't work. The sound didn't work. I also had zero luck with XawTV, Zapping, or Mplayer. In looking for solutions I ran across mention of another program called "TVtime." I downloaded it and lo-and-behold it WORKED! Right from the start it not only saw the card but when I launched TVtime I was watching channel 2 on my Cable TV.
So I installed the "Launcher" plug-in for XBMC and configured a launcher for TVtime, then added that launcher to my Favorites. From the main page of XBMC I can hit my Favorites and select "TV Tuner" and BAM! TV Time opens up and I can watch TV.
Other plug-ins I installed that worked for me (ones with "*" by them also worked in XBMC 9.04):
Program:
Launcher
Emulauncher*
SVN Installer
XBMC-Zone Installer
Video:
Animefreak
Bleach7*
CBS*
PBS
CNN*
NBC
SY-FY
USA
YouTube
G4*
National Geographic*
FreeMovies
These ones didn't work right and I uninstalled them:
Animeseed (plugin works, but folders were empty)
InstanzAnime (plugin doesn't die, but couldn't find any content in the folders)
Veoh (crashes during video buffering)
Navi-X (hit and miss with content)
VideoMonkey (hit and miss with content working)
Yahoo Music Videos
myTV (python script error)
ABC (Australia) and CBC (die with a script error)
Accuweather (script freezes while retrieving data)
I didn't even bother finding a plugin or script for Hulu.com because I know none of them work right now. Hulu has been in sort of a war with "scrapers" and changed how their site worked in a way that broke the Hulu plug-ins. But I watch a lot of stuff on Hulu, so what am I gonna do?
I created a launcher for Firefox with Hulu set as the home page. I can launch it from within XBMC and hit F11 to pop the browser full screen. I tweaked the settings to over-ride the fonts with some GIGANTIC ones I can actually see on a TV screen from across the room. A good work-around, I figured, until a working Hulu plugin or script surfaces again, right? Well, not as good a work-around as I'd have liked.
Adobe Flash Player on Linux SUCKS. Especially for full-screen playback, where it turns everything into an unwatchable slide-show. This appears to be more of a problem on system withotu Nvidia cards because of the stupid way Adobe decided to check for hardware direct rendering with the "SGI" vendor flag. SGI contributed code to the OpenGL project a long time ago, so just about any cards out there that aren't Nvidia (and I've heard evne some of them) report the vendor string as "SGI." But Flash on Linux turns off hardware support if it sees that and forces you to use the software rendering, which is CPU intensive - no, make that VERY CPU intensive - and makes for unwatchable fullscreen videos. I obviously have harware accelerated direct rendering working or XBMC wouldn't even start, so I found out you're supposed to be able to over-ride the shoddy detection by creating a folder and file at /etc/adobe/mss.cfg and inside that file put the line OverrideGPUvalidation=1. Does it work? Not very well. It slightly improved playback, but not in full-screen mode. Ok, the videos play decent at their original embedded size on the Hulu pages, but that's kind of tiny. Here's what I have to do to watch it any larger:
1. Quit XBMC because no other OpenGL programs can be running
2. Use the "Pop-Out" option instead of the "Full Screen" option.
3. Once the littel pop-out window has loaded I have to close the window from which it popped - you can't even have another instance of Flash running because it's using OpenGL too.
4. Hit F11 on the Pop-Out window. I get a bigger version that still has slightly choppy playback and I have to live with the "playhead" bar across the bottom of the screen, but it's still better than watching a postage stamp sized video.
Can we say "Pain in the ass?" This isn't likely to be "fixed" until a couple of things happen. Either Hulu has to stop breaking the XBMC plugins and let them scrape the video content (unlikely), XBMC developers need to come up with an unbreakable way of scraping content (unlikely), or Adobe needs to rewrite the Flash Player for Linux so it actually works as well as the one for Windows (unlikely).
SO, if you like to watch a lot of Hulu.com videos you will want to watch them on a Windows system, since that's the only platform on which Adobe cares to make their player function properly. If you want to build an XBMC system and use Windows as the desktop system underneath I'd recommend only doing that with a Windows 7 machine. I couldn't get XBMC 9.11 to work on a Windows XP system at all. Apparently XBMC 9.04 does work (because it uses OpenGL rather than DirectX), but I also found almost none of the plugins work under 9.04 which makes the whole idea of using XBMC kind of pointless. To summarize:
Use LINUX if you want:
Stable, Free, Secure
Don't care so much about Hulu content
Don't have an ATI graphics card
Use Windows 7 if you want:
Hulu has to play smoothly in Flash
You have an ATI graphics card
You have any other hardware that's poorly supported on Linux
What I ended up with is a system I can use to:
Watch DVDs
Watch YouTube videos
Watch Free Movies
Catch TV shows from a number of networks
Watch Live TV
Stream Net Radio
Play MP3s and CDs
Play retro video games
Get my local weather instantly
Access the Internet on my TV
Do this all with a keyboard and mouse across the room on the couch
I'll save anyone with an ATI TV Wonder Pro tuner card a lot of trouble setting up the audio. Apparently only SOME of the cards have PCI Audio enabled, the rest will ONLY output sound through the (green) line jack on the back of the card. Here's how you find out which one you have:
1. Open a Terminal
2. Type: lspci -n
3. Look for: 14f1:8801 or 14f1:8811 (Hooray! You have PCI sound enabled card!)
4. If it says 14f1:8800 you're out of luck. Gotta patch sound physically OUTSIDE the computer.
You have a couple of options to patch sound physically:
1. TWO SOUND OUTPUTS
Connect a set of amplified speakers to the sound output of the TV card, or run a patch cable to a stereo receiver and select that input when you want TV sound. You'll have to have ANOTHER set of speakers, or ANOTHER patch cable running from the sound output of your computer audio card. In other words, your TV and Computer sound outputs are not connected to each other in any way! If you have set up the 3 jacks on your sound card for Surround Sound you will HAVE to run independent audio connections.
2. PATCH TV SOUND TO AUDIO CARD
You can only do this if you either have more than one audio card in your computer OR if you only have one audio card that you are NOT using it for Surround Sound output! You'll need a small 1/8" male to 1/8" patch cable long enough to run from the (green) audio output on the TV card to the "Line In" port on your audio card. Then in the ALSA Mixer make sure that "Line In" is not muted and has full volume.
The last piece of the Live TV puzzle was to get Television Listings on my TV I can browse (similar to the on-screen listings you get with digital TV or satellite). The main script used on XBMC for that purpose is called "myTV" but it would kick out a Python scripting error when I tried to run it. I couldn't even get to the configuration screen. "TVtime" can incorporate XMLTV data into its on-screen display, if you can actually GET the XMLTV data. Part of the problem is in finding FREE listing services. Most plugins, programs, and scripts out there use "Schedules Direct" which has gone to a subscription service for $20/year. They also apparently own Zap2It, and so I've read on the XBMC forums the "Zap2It Labs" supports open-source projects and there IS an authorization code for XBMC software to get the listing data, but the only two listing scripts or plugins I could find were "myTV" and "WebScheduler" - neither of which would work (the latter wouldn't even install). XMLTV is available from the Ubuntu repositories, but that really is just a collection of EPG scripts. The "North America" ones access Schedules Direct, so those were useless to me. Then I found "mc2xml" which is a small stand-alone program that can access different EPG providers and generate an XMLTV-complient file. To get free listings the program accesses "TitanTV" which is also a problem. TitanTV's EPG service requires a 30 digit ID number to work, and the ID provided with "mc2xml" has been deactivated. Apparently the manufacturers of tuner cards pay TitanTV for access (and that cost is figured into the price of the card when you buy it). The ID number is a UUID related to the hardware (not exactly easy to get because you have to use a packet sniffer to capture it). In theory there is one ID per card, so only one user per ID. If they detect too many users with the same ID then TitanTV deactivates that ID number and it no longer works. Which is why nobody who HAS one of these ID number will let anyone else use it!
However, you can go to Zap2It.com or TitanTV.com and put in your information (without even needing to register for an account) and get your local TV listings in a web browser. So my solution was to just bookmark those sites in Firefox and when I want the on-screen listings I just use my Firefox launcher. The "myTV" listings looked pretty good in the screen-shots I've found, so it would be great if that would work within XBMC, but until the plug-in gets fixed on Linux the browser work-around will have to do.
Obviously building a HTPC out of cast-off parts isn't the ideal way to do it, and there are still a lot of issues with "scraping" content (audio, videos, TV listings) from web sites. If I had money for an HTPC it would be hard to argue with just BUYING a "media center" computer that already has all the software and hardware working together.
Subscribe to:
Posts (Atom)